I wasn’t expecting cooking advice from the guy who fixes my car, but there I was, waiting for an oil change, listening to him describe exactly how to make the most popular thing at his kid’s Halloween party. His hands were still greasy, and he was pulling up photos on his phone—little crescent-wrapped hot dogs with tiny mustard eyes staring back at me. Honestly, I almost laughed. My mechanic? Giving me a party recipe? But let me tell you, when a grown man in coveralls gets that excited about a snack, you pay attention.
He told me the kids went absolutely nuts for them. The parents too, actually. He said he’d made three batches, and they vanished within minutes. I scribbled his instructions on the back of a receipt I found in my glove compartment—”just wrap ’em like bandages, leave a little face showing.” That was three years ago, and I’ve been making these Mummy Hot Dogs for every Halloween party, spooky movie night, and frankly, any excuse to gather people around a platter of something cute and delicious ever since.
There was a small hiccup that first time, of course. I used too much dough and the “bandages” were so thick you could barely see the hot dog. They looked more like overstuffed pillows than mummies. But you know what? They still tasted amazing. And that’s the thing about this recipe—it’s forgiving. It’s fun. And it’s the kind of thing that makes people smile the second they walk in the door. If you’ve ever needed a guaranteed crowd-pleaser that looks like you put in way more effort than you actually did, this is it.
Why You’ll Love This Recipe
Let’s be real—when you’re hosting a party, the last thing you want is a recipe that has you sweating in the kitchen while your guests are having all the fun. These Mummy Hot Dogs are the opposite of that. They come together in about 20 minutes, use just two main ingredients, and somehow manage to look both adorable and impressive. I’ve tested this recipe at potlucks, birthday parties, and casual get-togethers, and I can tell you with absolute confidence—they disappear faster than almost anything else on the table.
- Quick & Easy: From fridge to table in under 25 minutes. Seriously. You can make these while your guests are still taking off their coats.
- Simple Ingredients: Hot dogs and crescent roll dough. That’s it. Plus a little mustard for the eyes. You probably have everything already.
- Perfect for Halloween Parties: They’re thematic without being overly complicated or messy. Kids and adults both lose their minds over them.
- Crowd-Pleaser: I’ve never, not once, seen leftovers. Not even close. People stand around the platter and just keep grabbing them.
- Unbelievably Fun: There’s something about food that looks like little characters that just makes people happy. It’s impossible to eat one without smiling.
What makes these different from other mummy hot dog recipes you might have seen? It’s the technique. I learned the hard way that how you cut the crescent dough matters. Too thick, and the mummy looks lumpy. Too thin, and it falls apart. I’ve perfected the exact width and wrapping method so your mummies look like actual mummies—not sad, squished blobs. Plus, I’ll share my trick for getting the eyes to stay put and not slide off into the oven. That was a game-changer, let me tell you.
This is the kind of recipe that makes you feel like a kitchen hero without breaking a sweat. It’s comfort food with a costume on—familiar, satisfying, and just a little bit silly. Perfect for when you want to impress your guests but also want to actually enjoy the party yourself.
What Ingredients You Will Need
This recipe uses the simplest ingredients you can imagine. That’s part of its magic. You don’t need to hunt down specialty items or make a separate trip to a fancy grocery store. Everything here is a pantry or refrigerator staple, and that’s exactly what you want when you’re prepping for a crowd.
- Hot Dogs: 1 package (about 8 hot dogs). Use your favorite brand. I personally prefer all-beef hot dogs for better flavor, but any variety works. Cocktail sausages or mini hot dogs are also fantastic if you want bite-sized mummies for a larger crowd—just adjust the baking time down a couple minutes.
- Crescent Roll Dough: 1 can (8 ounces) refrigerated crescent roll dough. This is the star of the show. I recommend Pillsbury Original Crescents for the best texture and ease of handling. The dough is flaky, buttery, and wraps around the hot dogs like a dream. If you’re feeding a big group, grab two cans.
- Mustard: A small squirt for the eyes. Yellow mustard works best because it’s bright and visible. You can also use ketchup or sriracha if you want different colors or a spicy kick. Just put a tiny dab on a toothpick or the tip of a knife to apply.
- Optional – Egg Wash: 1 egg, beaten with 1 tablespoon of water. Brushing this over the dough before baking gives the mummies a beautiful golden-brown color. It’s not strictly necessary, but it makes them look more polished. I do it when I’m serving guests I want to impress.
- Optional – Sesame Seeds or Poppy Seeds: A light sprinkle after the egg wash adds a little texture and makes the mummies look even more “wrapped.” It’s a small touch that guests always notice.
That’s genuinely it. Two main ingredients, plus a few optional extras that take things from “cute” to “wow.” The beauty of this recipe is its simplicity—you don’t need a dozen different components to create something memorable. Just good hot dogs, flaky dough, and a little creativity.
One thing I’ve learned over the years: don’t overthink the hot dog choice. I’ve tried fancy smoked sausages, chicken sausages, and even vegetarian options. They all work, but honestly? Classic hot dogs have the best texture and the most nostalgic flavor. They’re what people expect, and they deliver every time.
Equipment Needed
You don’t need a fully stocked professional kitchen for this recipe. In fact, you probably have everything already. But having the right tools makes the process smoother and more enjoyable.
- Baking Sheet: A standard half-sheet pan works perfectly. Line it with parchment paper or a silicone baking mat for easy cleanup. Trust me, you’ll thank yourself later.
- Sharp Knife or Pizza Cutter: You’ll be cutting the crescent dough into thin strips. A pizza cutter makes this incredibly easy and gives you straight, even lines. A sharp chef’s knife works too, but a pizza cutter is my go-to.
- Pastry Brush: For applying the egg wash. A silicone brush is easiest to clean, but any pastry brush will do. If you don’t have one, you can use a paper towel—just dab it gently.
- Small Bowl: For beating the egg wash. Nothing fancy needed.
- Toothpicks or Tweezers: For placing the mustard eyes. Toothpicks give you more control than trying to squeeze directly from the bottle. A clean pair of tweezers also works surprisingly well.
- Cooling Rack: Optional but helpful. Letting the mummies cool on a rack for a minute or two prevents the bottoms from getting soggy.
I bought a cheap pizza cutter at the grocery store years ago, and it’s become one of my most-used kitchen tools. It cost maybe five dollars, and it makes cutting dough for recipes like this so much faster. If you don’t have one, it’s a worthwhile investment—you’ll use it for cookies, flatbreads, and all kinds of projects.
Preparation Method
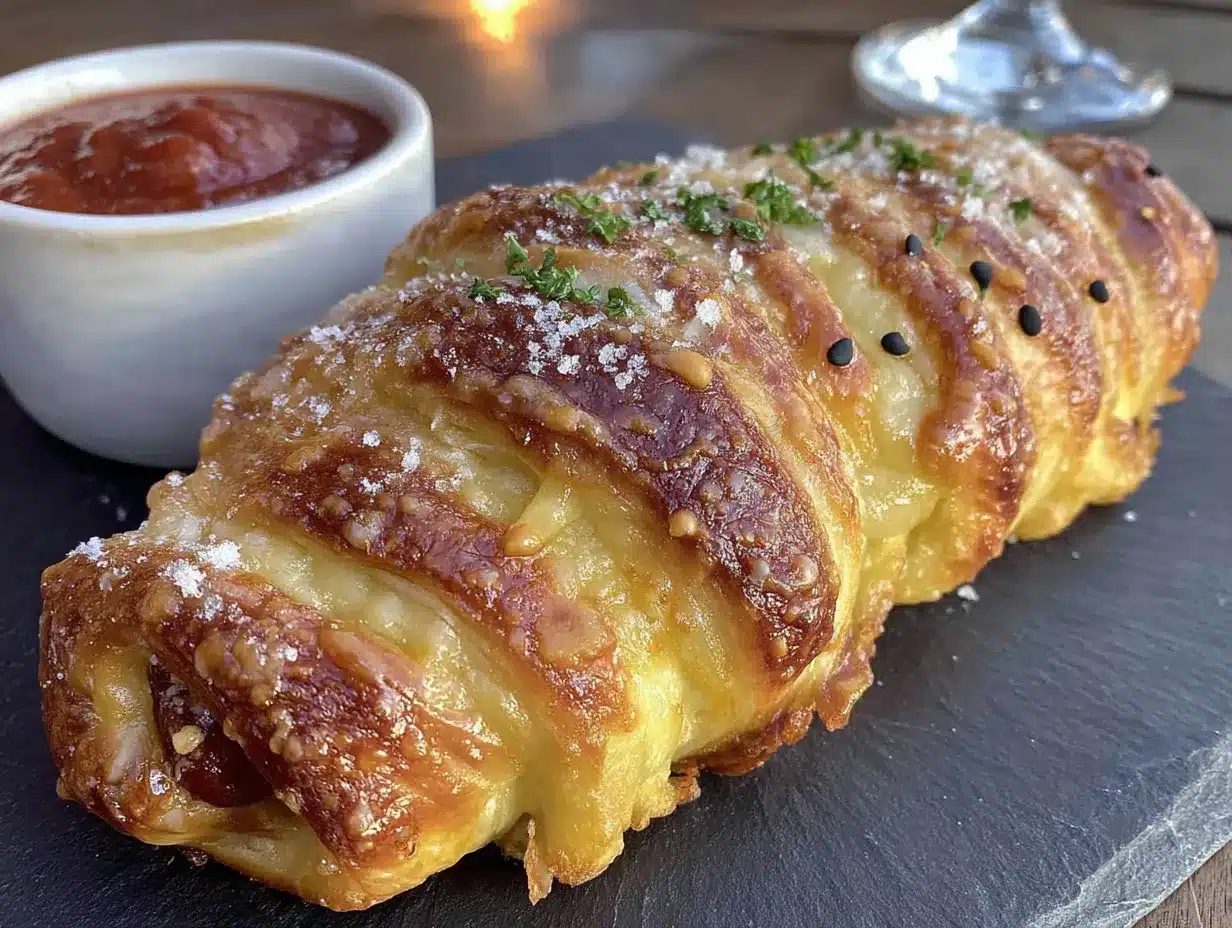
Alright, let’s get into the actual making of these little guys. The process is straightforward, but I’ll walk you through every step so you get perfect mummies every time. Pay attention to the dough-cutting part—that’s where most people go wrong.
- Preheat your oven to 375°F (190°C). Line a baking sheet with parchment paper or a silicone mat. Getting the oven hot before you start wrapping ensures everything bakes evenly.
- Unroll the crescent dough. Open the can carefully—it usually pops open with a satisfying crack. Unroll the dough onto a clean cutting board or countertop. You’ll see perforated triangles where the dough is meant to separate for traditional crescent rolls. Don’t separate them. You want the whole sheet intact.
- Pinch the perforations closed. Gently press along the seams where the triangles meet. This creates one solid rectangle of dough. It doesn’t have to be perfect—just press until the lines disappear. This step is crucial because you’ll be cutting the dough into strips, and you don’t want them falling apart at the seams.
- Cut the dough into thin strips. Using your pizza cutter or sharp knife, slice the dough lengthwise into strips about ¼ to ½ inch wide. You should get about 8 to 10 strips per can of dough. Don’t worry if they’re not perfectly even—mummies don’t have to be uniform. In fact, slightly uneven strips make them look more authentically wrapped.
- Prepare the hot dogs. If you want shorter mummies, cut each hot dog in half crosswise. I usually leave them whole for a more dramatic presentation, but half-size mummies are perfect for kids or appetizer portions. Pat the hot dogs dry with a paper towel. This helps the dough stick better.
- Wrap the mummies. Take one strip of dough and wrap it around a hot dog, starting at one end. Leave a small gap near the top for the face. Overlap the dough slightly as you go, like you’re wrapping a bandage. Don’t pull the dough too tight—leave a little slack so it looks loose and mummy-like. Tuck the end of the strip underneath the hot dog to secure it.
- Place on the baking sheet. Arrange the wrapped mummies on the prepared baking sheet, leaving about an inch of space between each one. They won’t spread much, but a little breathing room helps them bake evenly.
- Apply the egg wash (optional). In a small bowl, beat the egg with a tablespoon of water. Using your pastry brush, lightly coat each mummy with the egg wash. This gives them that gorgeous golden-brown color. If you’re skipping this step, no worries—they’ll still taste great, just a little paler.
- Bake for 10-12 minutes. Place the baking sheet in the preheated oven and bake until the dough is golden brown and cooked through. The hot dogs will be hot and juicy. Keep an eye on them after the 10-minute mark—ovens vary, and you don’t want burnt mummies.
- Cool slightly and add eyes. Let the mummies cool on the baking sheet for about 2 minutes. They’ll be too hot to handle right away. Using a toothpick or the tip of a knife, place two small dots of mustard on each mummy for eyes. Don’t press too hard—just a gentle dab. The heat from the dough will help the mustard stick.
- Serve immediately. Arrange the mummies on a platter and watch them disappear. They’re best enjoyed warm, when the dough is still flaky and the hot dog is perfectly juicy.
A quick note: if you’re making a large batch, work in groups. Wrap all the mummies from one can of dough before opening the next. This keeps the dough from drying out and becoming difficult to handle. I learned this the hard way after struggling with cracked dough on my second batch.
Cooking Tips & Techniques
After making these Mummy Hot Dogs more times than I can count, I’ve picked up a few tricks that make the process smoother and the results more consistent. Here’s what I wish someone had told me the first time.
Don’t overwork the dough. Crescent roll dough is delicate. The more you handle it, the tougher it becomes. When you’re cutting the strips and wrapping the hot dogs, work quickly and gently. If the dough starts to feel sticky or warm, pop it in the fridge for five minutes to firm up.
Leave space for the face. This seems obvious, but I’ve definitely made mummies where the “bandages” covered everything, and they just looked like weird dough logs. Leave about half an inch at the top of the hot dog uncovered. That’s where the eyes go, and it’s what makes them look like actual mummies.
Use a light hand with the mustard. A tiny dab is all you need. If you squeeze too much, it can run down the hot dog and make a mess. I use the tip of a toothpick to place the eyes—it gives me perfect control, and I can make them any size I want.
Bake on the middle rack. The middle rack gives you the most even heat distribution. If you bake too close to the top, the dough might brown too quickly before the inside is cooked. Too close to the bottom, and the bottoms could burn. Middle is your friend.
Make ahead tip. You can wrap the mummies up to a few hours in advance and keep them in the refrigerator on the baking sheet, covered with plastic wrap. Just pop them in the oven when your guests arrive. This is a lifesaver for parties—you get to enjoy the appetizers and drinks instead of being stuck in the kitchen.
One mistake I made early on: I tried to use reduced-fat crescent dough. Don’t do it. The texture is different, and it doesn’t brown as nicely. Full-fat original crescent rolls are the way to go. Trust me on this one.
Variations & Adaptations
One of the best things about this recipe is how adaptable it is. You can change almost everything and still end up with something delicious. Here are some variations I’ve tried and loved.
- Cheesy Mummies: Before wrapping the hot dog, cut a slit lengthwise down the center and stuff it with a thin strip of cheddar or mozzarella cheese. The cheese melts as it bakes, and you get a gooey, delicious surprise in every bite. This is my personal favorite variation.
- Spicy Mummies: Use spicy sausages or brush the hot dogs with sriracha before wrapping. You can also add a tiny dot of sriracha for the eyes instead of mustard. The heat balances perfectly with the buttery dough.
- Veggie Mummies: For a vegetarian option, use veggie dogs or even cheese sticks wrapped the same way. The baking time stays about the same. I’ve made these for vegetarian friends, and they were a huge hit.
- Breakfast Mummies: Swap the hot dogs for breakfast sausages or pre-cooked sausage links. Serve them with a side of maple syrup for dipping. Sweet and savory together—absolutely incredible.
- Pizza Mummies: Brush the wrapped mummies with a little pizza sauce before baking, then sprinkle with shredded mozzarella. Bake as directed, and you’ve got pizza-flavored mummies. Kids go crazy for these.
Don’t be afraid to experiment. The basic technique is so simple that you can really run with it. I once made dessert mummies using chocolate chip cookie dough wrapped around banana pieces. They weren’t pretty, but they were delicious. The point is to have fun and make the recipe your own.
Serving & Storage Suggestions
These Mummy Hot Dogs are best served warm, right out of the oven. The dough is at its flakiest, and the hot dog is perfectly juicy. But they’re not fussy—they hold up well at room temperature for a while, which makes them perfect for parties.
Presentation tips: Arrange the mummies on a large platter, standing up slightly or lying down with their “faces” facing outward. I like to scatter a few fake spider webs or plastic spiders around the platter for a spooky effect. A small bowl of ketchup and mustard for dipping in the center completes the look. For a dinner party, serve them alongside a crisp green salad or a bowl of chili for dipping.
Storage: If you have leftovers (which, honestly, is rare), store them in an airtight container in the refrigerator for up to 3 days. The dough will soften slightly, but they’ll still taste great. To reheat, pop them in a 350°F oven for about 5 minutes, or until warmed through. The microwave works in a pinch, but the oven gives you better texture.
Freezing: You can freeze the unbaked mummies. Wrap them as directed, place them on a baking sheet, and freeze until solid. Then transfer them to a freezer bag. When you’re ready to bake, add about 5 minutes to the baking time—no need to thaw. This is a great make-ahead option for busy hosts.
Flavor development: Honestly, these are best fresh. The dough doesn’t improve with time like a stew or a braise. But they’re so quick to make that it’s not really an issue. Just bake them right before your guests arrive, and you’ll be golden.
Nutritional Information & Benefits
Let’s be honest—these Mummy Hot Dogs are a treat, not a health food. But that’s okay! Sometimes you need something fun and indulgent, especially when you’re celebrating. Here’s a rough breakdown per mummy (based on one hot dog and the dough from one crescent roll):
- Calories: Approximately 200-250
- Protein: 7-8 grams
- Fat: 14-16 grams
- Carbohydrates: 14-16 grams
- Sodium: 600-700 mg
If you’re looking to lighten things up, you can use turkey or chicken hot dogs, which are lower in fat and calories. The crescent dough is harder to substitute, but you can find reduced-fat versions if that’s a priority. I will say, though—sometimes the full-fat version is worth it for the taste and texture.
One small benefit: hot dogs do contain some protein and iron. And the crescent dough provides carbohydrates for quick energy. So they’re not completely empty calories. But again, this is a party food. Enjoy it for what it is, and don’t stress about the numbers.
Conclusion
I still think about that day at the mechanic’s shop every time I make these Mummy Hot Dogs. It’s funny how the best recipes come from the most unexpected places. A greasy receipt, a guy in coveralls, and a simple idea that turned into one of my most-requested party dishes. That’s the beauty of cooking—you never know where inspiration will strike.
These mummies are more than just a snack. They’re a conversation starter, a crowd-pleaser, and honestly, just a whole lot of fun. Whether you’re hosting a Halloween bash, a spooky movie marathon, or just a casual get-together with friends, they deliver every single time. And the best part? You can make them your own. Add cheese, spice them up, go vegetarian—whatever fits your vibe.
I’d love to hear how yours turn out. Did you try a fun variation? Did the kids go crazy for them? Drop a comment below and let me know. Share this recipe with a friend who loves hosting, and don’t forget to pin it for later. Happy cooking, and here’s to many more unexpected recipe discoveries!
Frequently Asked Questions
Can I use homemade dough instead of crescent roll dough?
Absolutely! If you have a favorite pizza dough or puff pastry recipe, it works beautifully. Just roll it out thin, cut it into strips, and proceed as directed. The baking time might vary slightly, so keep an eye on the color.
How do I keep the mustard eyes from sliding off?
Let the mummies cool for about 2 minutes before adding the eyes. The residual heat helps the mustard stick. Also, use a tiny amount—just a dab on the tip of a toothpick. Too much mustard will slide right off.
Can I make these in an air fryer?
Yes! Preheat your air fryer to 350°F (175°C). Place the mummies in the basket in a single layer, leaving a little space between each. Cook for 6-8 minutes, or until golden brown. Check them at the 6-minute mark to avoid burning.
What’s the best way to reheat leftovers?
The oven is your best bet. Preheat to 350°F (175°C) and bake for 5-7 minutes. The microwave works in a pinch, but the dough won’t be as crispy. I don’t recommend reheating more than once.
Can I use hot dog buns instead of crescent dough?
Technically yes, but they won’t look like mummies. The crescent dough is what gives you that wrapped, bandage-like appearance. If you’re in a pinch, you could use pre-made pizza dough or even flour tortillas cut into strips.
Pin This Recipe!

Mummy Hot Dogs Recipe: Easy Crescent Roll Wraps

These Mummy Hot Dogs are a fun and easy Halloween party snack made with hot dogs wrapped in crescent roll dough, baked until golden, and finished with mustard eyes. They come together in about 20 minutes and are a guaranteed crowd-pleaser.
- Prep Time: 10 minutes
- Cook Time: 12 minutes
- Total Time: 22 minutes
- Yield: 8 servings 1x
- Category: Appetizer
- Cuisine: American
Ingredients
- 1 package (about 8) hot dogs
- 1 can (8 ounces) refrigerated crescent roll dough
- Yellow mustard (for eyes)
- 1 egg, beaten with 1 tablespoon water (optional, for egg wash)
- Sesame seeds or poppy seeds (optional, for garnish)
Instructions
- Preheat your oven to 375°F (190°C). Line a baking sheet with parchment paper or a silicone mat.
- Unroll the crescent dough onto a clean cutting board. Pinch the perforations closed to form one solid rectangle.
- Using a pizza cutter or sharp knife, cut the dough lengthwise into strips about ¼ to ½ inch wide (about 8 to 10 strips per can).
- If desired, cut each hot dog in half crosswise for shorter mummies. Pat the hot dogs dry with a paper towel.
- Take one strip of dough and wrap it around a hot dog, starting at one end. Leave a small gap near the top for the face. Overlap the dough slightly as you wrap, leaving a little slack. Tuck the end underneath to secure.
- Place the wrapped mummies on the prepared baking sheet, about 1 inch apart.
- If using egg wash, brush each mummy lightly with the beaten egg mixture.
- Bake for 10-12 minutes, until the dough is golden brown and cooked through.
- Let the mummies cool on the baking sheet for about 2 minutes.
- Using a toothpick or the tip of a knife, place two small dots of mustard on each mummy for eyes.
- Serve immediately.
Notes
For best results, use full-fat original crescent rolls. Don’t overwork the dough. Leave about half an inch at the top of the hot dog uncovered for the face. Use a light hand with the mustard. Bake on the middle rack for even heat. Mummies can be wrapped up to a few hours in advance and refrigerated. For an air fryer, cook at 350°F for 6-8 minutes.
Nutrition
- Serving Size: 1 mummy
- Calories: 225
- Sugar: 3
- Sodium: 650
- Fat: 15
- Saturated Fat: 5
- Carbohydrates: 15
- Protein: 7
Keywords: mummy hot dogs, Halloween appetizer, crescent roll wraps, easy party snack, spooky food



