“You know that moment when you open the freezer hoping for a quick meal, and it’s just sad sad sad?” That was me last Friday night, staring into a barren icebox with nothing but a lone bag of frozen peas. Honestly, I was too tired to cook but hungry enough to want something better than cereal. Then I remembered the batch of crispy make-ahead pizza pockets I’d whipped up a few weekends ago. The magic of these little pockets is how they combine convenience with that irresistible crunch and melty cheese, even after freezing. Let me tell you, biting into one after reheating felt like a tiny celebration.
This recipe came about during a chaotic week when I needed fast, freezer-friendly meals that didn’t taste like cardboard. I wasn’t sure if freezing pizza pockets would keep them crispy, but a little trial-and-error (read: a near disaster with soggy bottoms) led me to the perfect method. The crispiness held up, the flavors stayed fresh, and the whole family gave it thumbs-up, which is saying something because my nephew can be a tough critic.
Maybe you’ve been there too—juggling work, family, and trying to eat something homemade that doesn’t require 45 minutes of prep. These crispy make-ahead pizza pockets are the kind of recipe that makes those busy nights a little easier and tasty. Plus, they freeze beautifully, so you can batch-make and stash them away for whenever hunger strikes. Let me walk you through how to make these golden, pocket-sized wonders that have become my secret weapon for easy freezer meals.
Why You’ll Love This Recipe
- Quick & Easy: Comes together in about 30 minutes, perfect for busy weekdays or last-minute cravings.
- Simple Ingredients: Uses common pantry staples and your favorite pizza toppings—no fancy trips to specialty stores required.
- Perfect for Freezer Meals: Make a big batch ahead of time, freeze, and reheat whenever you need a hassle-free dinner or snack.
- Crowd-Pleaser: Always a hit with kids and adults alike; great for lunchboxes, after-school snacks, or casual get-togethers.
- Unbelievably Crispy: The secret method keeps the crust delightfully crunchy even after freezing and reheating.
What sets this recipe apart is the technique I developed for sealing and baking the pockets to lock in the filling’s moisture without making the crust soggy. I also blend a bit of shredded mozzarella into the dough for a subtle, cheesy chew that’s just fun to bite into. Honestly, it’s not just another pizza pocket—it’s the one I reach for when I want something homemade yet foolproof.
Whether you’re meal prepping for the week or need a quick freezer meal, these pockets bring a little slice of comfort food magic with zero stress. I promise, once you try making your own, you’ll wonder why you ever bought frozen versions that never quite hit the mark.
What Ingredients You Will Need
This recipe uses simple, wholesome ingredients to deliver bold flavor and satisfying texture without the fuss. Most are pantry staples, and you can easily swap out toppings to suit your taste or dietary needs.
- For the Dough:
- All-purpose flour – 2 ½ cups (300 g), plus extra for dusting
- Instant yeast – 2 ¼ teaspoons (one packet)
- Granulated sugar – 1 tablespoon (balances yeast flavor)
- Salt – 1 teaspoon
- Warm water – 1 cup (240 ml), about 110°F/43°C
- Olive oil – 2 tablespoons (adds tenderness and flavor)
- Shredded mozzarella cheese – ½ cup (about 50 g), mixed into the dough for a subtle cheesy bite (optional but recommended)
- For the Filling:
- Pizza sauce – ½ cup (120 ml), preferably homemade or a trusted brand like Rao’s for rich flavor
- Shredded mozzarella cheese – 1 ½ cups (150 g), packed with melty goodness
- Mini pepperoni slices – ½ cup (optional, can substitute with cooked sausage or veggies)
- Chopped bell peppers – ½ cup, for a fresh crunch
- Sliced black olives – ¼ cup (adds a nice salty contrast)
- Dried Italian herbs – 1 teaspoon (oregano, basil, thyme blend)
- For Assembly:
- Egg wash – 1 large egg beaten with 1 tablespoon water (for golden crust)
- Semolina flour or cornmeal – for dusting baking sheet (gives extra crunch)
If you prefer a gluten-free option, I’ve had success swapping the all-purpose flour with a gluten-free baking blend like King Arthur’s gluten-free flour. For dairy-free versions, use vegan cheese and olive oil in place of butter, and substitute with coconut yogurt if you want to add tang to the dough. Seasonal swaps like fresh spinach or mushrooms work beautifully as well.
Equipment Needed
- Mixing bowl – a large one to combine and knead dough comfortably
- Measuring cups and spoons – for accurate ingredient amounts
- Rolling pin – essential for rolling out dough evenly; if you don’t have one, a clean wine bottle can work in a pinch
- Baking sheet or pizza stone – a sturdy, rimless pan works best to let heat circulate and keep the bottoms crisp
- Parchment paper or silicone baking mat – prevents sticking and helps with cleanup
- Pastry brush – for applying the egg wash evenly (a cheap but handy tool)
- Sharp knife or pizza cutter – to trim and shape the pockets neatly
I’ve tried making these without a rolling pin, and while it’s doable, having that tool makes the process smoother and the dough thickness more consistent. My favorite baking sheets are heavy-duty ones from Nordic Ware—they hold heat well and help with even browning. Also, if you plan to make these regularly, a digital kitchen scale is a game-changer for consistent dough results.
Preparation Method
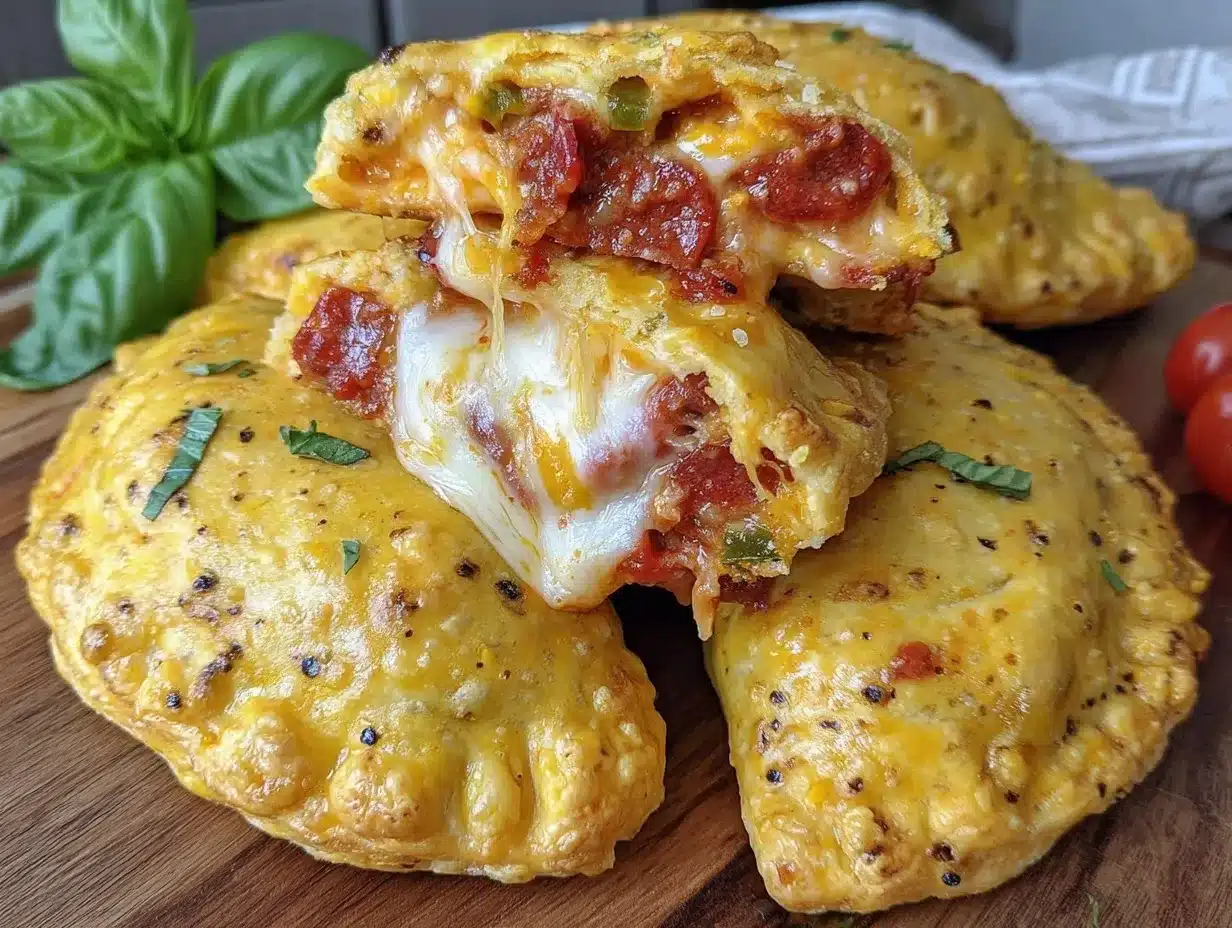
- Activate the Yeast: In a small bowl, combine warm water (110°F/43°C), sugar, and instant yeast. Stir gently and let it sit for 5-10 minutes until foamy. This means the yeast is alive and kicking.
- Make the Dough: In a large mixing bowl, whisk together the flour, salt, and shredded mozzarella cheese. Pour in the yeast mixture and olive oil. Stir with a wooden spoon until a shaggy dough forms.
- Knead the Dough: Transfer dough to a floured surface and knead for 8-10 minutes until smooth and elastic. If the dough feels sticky, sprinkle a little more flour, but don’t overdo it or the pockets will be tough.
- First Rise: Place dough in a lightly oiled bowl, cover with a clean kitchen towel, and let it rise in a warm spot for 1 hour or until doubled in size. I usually leave mine near the stove while dinner cooks.
- Prepare Filling: While the dough rises, mix pizza sauce, shredded mozzarella, pepperoni, bell peppers, olives, and Italian herbs in a bowl. Taste and adjust seasoning if needed.
- Shape the Pockets: Once risen, punch down the dough gently. Divide it into 8 equal portions. Roll each piece on a floured surface into a 6-inch (15 cm) circle.
- Fill and Seal: Spoon about 2-3 tablespoons of filling onto one half of each circle, leaving a small border. Fold the dough over to create a half-moon shape. Press edges firmly with your fingers, then crimp with a fork to seal completely.
- Apply Egg Wash: Place pockets on parchment-lined baking sheet dusted with semolina flour or cornmeal. Brush each with egg wash for a shiny, golden finish.
- Freeze or Bake: For freezing, arrange pockets in a single layer on a baking sheet and freeze for 2 hours. Then transfer to freezer bags for storage up to 3 months. To bake immediately, preheat oven to 400°F (200°C) and bake for 15-18 minutes until golden and crispy.
- Reheat from Frozen: When ready to eat, bake frozen pockets on a baking sheet at 375°F (190°C) for 20-25 minutes until heated through and crispy. No need to thaw!
A quick tip: If the edges don’t seal well, the filling might leak during baking, so take your time pressing them firmly. Also, keep an eye on the first batch in the oven to understand your oven’s quirks for timing and browning.
Cooking Tips & Techniques
Let me share some kitchen-tested tips that make these pizza pockets stand out:
- Don’t skip the semolina flour or cornmeal: Dusting the baking sheet prevents soggy bottoms and adds a subtle crunch.
- Keep fillings dry: If using fresh veggies like mushrooms or spinach, sauté and drain excess moisture before adding to the filling. Otherwise, the pockets risk becoming soggy.
- Seal edges well: This is crucial to keeping the filling inside. Use a fork to crimp and press firmly. Sometimes I get distracted and forget this step—hello, messy oven!
- Egg wash is your friend: It gives a beautiful golden color and a slight sheen that looks so inviting.
- Batch freeze flat: Freeze pockets on a single layer first before bagging. This keeps them from sticking together and makes reheating easier.
- Multitask by prepping filling while dough rises: Saves time and keeps workflow smooth.
One mistake I made early on was using cold water for the yeast, which slowed the rise dramatically. Another time, I overfilled a pocket, and the sauce oozed out, making a bit of a mess. Learning to balance filling amount and sealing technique really helped perfect the recipe.
Variations & Adaptations
These crispy make-ahead pizza pockets offer great flexibility to suit your tastes and dietary needs:
- Vegetarian version: Load the filling with roasted veggies like zucchini, eggplant, and mushrooms. I like adding fresh basil for an herby punch.
- Gluten-free adaptation: Use a gluten-free flour blend that measures cup-for-cup. The texture will be slightly different but still delicious.
- Spicy twist: Add sliced jalapeños or a dash of red pepper flakes to the filling for a kick. Great for those who like a little heat!
- Different cooking methods: These pockets also work in an air fryer—cook at 375°F (190°C) for about 12-15 minutes until crispy.
- Personal favorite variation: I once swapped the pepperoni for cooked chorizo and added caramelized onions—game changer!
Serving & Storage Suggestions
Serve these pizza pockets warm, right out of the oven or reheated. They’re perfect paired with a simple green salad or a bowl of marinara sauce for dipping. For drinks, a cold soda or iced tea balances the richness nicely.
To store, place cooled pizza pockets in an airtight container or freezer bags. They keep well in the fridge for up to 3 days or freeze for up to 3 months. When reheating, the oven or air fryer works best to bring back that crispy crust—microwaving tends to make them a bit chewy.
Interestingly, the flavors develop a bit more depth after a day in the fridge, so if you’re meal prepping, you might find the leftovers taste even better the next day.
Nutritional Information & Benefits
Each pizza pocket contains approximately 250-300 calories depending on fillings, with about 12 grams of fat, 30 grams of carbohydrates, and 12 grams of protein. The cheese adds calcium and protein, while the veggies contribute fiber and vitamins.
This recipe can be tailored for lower-carb diets by swapping regular flour for almond flour or coconut flour blends, though texture will vary. It’s gluten-friendly if you use a gluten-free flour mix. Just watch out for allergens like dairy and wheat if you’re serving guests with sensitivities.
From a wellness perspective, making your own pizza pockets lets you control the ingredients, avoid preservatives, and sneak in fresh veggies, which is always a win compared to store-bought frozen options.
Conclusion
These crispy make-ahead pizza pockets have become my go-to for easy freezer meals that don’t compromise on flavor or texture. They strike that rare balance between convenience and homemade goodness, which honestly feels like a small miracle on busy days.
Feel free to tweak the fillings, experiment with different cheeses or herbs, and make the recipe truly your own. I love knowing there’s always a stash of these crispy pockets waiting in my freezer for those nights when cooking feels like a chore.
If you try this recipe, drop a comment below telling me your favorite fillings or any fun twists you came up with—I’m always eager to hear how you make it yours. Happy baking and snacking!
FAQs
Can I make these pizza pockets ahead and freeze them?
Absolutely! Bake them fresh or freeze them raw on a baking sheet, then transfer to freezer bags. They keep well up to 3 months and reheat beautifully without losing crispness.
What’s the best way to reheat frozen pizza pockets?
Reheat in a preheated oven at 375°F (190°C) for 20-25 minutes or use an air fryer at the same temperature for 12-15 minutes. This keeps the crust crispy and the filling hot.
Can I use different fillings in these pizza pockets?
Yes! Feel free to customize with your favorite pizza toppings—veggies, meats, or even vegan cheese. Just make sure to avoid overly wet ingredients to prevent sogginess.
Is there a way to make the dough gluten-free?
You can substitute all-purpose flour with a gluten-free baking blend that measures cup-for-cup. The texture might be slightly different, but it works well.
Can I make these pizza pockets without an egg wash?
Yes, but the egg wash gives a lovely golden color and shiny finish. You can substitute with a little olive oil brushed on top for a similar effect.
By the way, if you enjoy recipes with a crispy crust, you might appreciate the crispy garlic chicken I shared recently, which also makes for an easy freezer meal option. And for something sweet to pair after, the homemade cinnamon rolls are a family favorite that bake up beautifully fresh or from frozen.
Pin This Recipe!

Crispy Make-Ahead Pizza Pockets Easy Freezer Meals Recipe
These crispy make-ahead pizza pockets combine convenience with irresistible crunch and melty cheese, perfect for quick freezer meals that reheat beautifully without losing crispness.
- Prep Time: 15 minutes
- Cook Time: 18 minutes
- Total Time: 1 hour 33 minutes
- Yield: 8 pizza pockets 1x
- Category: Main Course
- Cuisine: Italian-American
Ingredients
- 2 ½ cups (300 g) all-purpose flour, plus extra for dusting
- 2 ¼ teaspoons instant yeast (one packet)
- 1 tablespoon granulated sugar
- 1 teaspoon salt
- 1 cup (240 ml) warm water (about 110°F/43°C)
- 2 tablespoons olive oil
- ½ cup (about 50 g) shredded mozzarella cheese (mixed into the dough, optional but recommended)
- ½ cup (120 ml) pizza sauce
- 1 ½ cups (150 g) shredded mozzarella cheese (for filling)
- ½ cup mini pepperoni slices (optional, can substitute with cooked sausage or veggies)
- ½ cup chopped bell peppers
- ¼ cup sliced black olives
- 1 teaspoon dried Italian herbs (oregano, basil, thyme blend)
- 1 large egg beaten with 1 tablespoon water (egg wash)
- Semolina flour or cornmeal for dusting baking sheet
Instructions
- Activate the yeast by combining warm water (110°F/43°C), sugar, and instant yeast in a small bowl. Stir gently and let sit for 5-10 minutes until foamy.
- In a large mixing bowl, whisk together flour, salt, and shredded mozzarella cheese. Pour in the yeast mixture and olive oil. Stir with a wooden spoon until a shaggy dough forms.
- Transfer dough to a floured surface and knead for 8-10 minutes until smooth and elastic. Add more flour if sticky, but avoid overdoing it.
- Place dough in a lightly oiled bowl, cover with a clean kitchen towel, and let rise in a warm spot for 1 hour or until doubled in size.
- While dough rises, mix pizza sauce, shredded mozzarella, pepperoni, bell peppers, olives, and Italian herbs in a bowl. Adjust seasoning if needed.
- Punch down the risen dough and divide into 8 equal portions. Roll each piece on a floured surface into a 6-inch (15 cm) circle.
- Spoon 2-3 tablespoons of filling onto one half of each circle, leaving a small border. Fold dough over to create a half-moon shape. Press edges firmly and crimp with a fork to seal.
- Place pockets on a parchment-lined baking sheet dusted with semolina flour or cornmeal. Brush each with egg wash for a golden finish.
- To freeze, arrange pockets in a single layer on a baking sheet and freeze for 2 hours. Transfer to freezer bags for storage up to 3 months.
- To bake immediately, preheat oven to 400°F (200°C) and bake for 15-18 minutes until golden and crispy.
- To reheat from frozen, bake on a baking sheet at 375°F (190°C) for 20-25 minutes until heated through and crispy. No need to thaw.
Notes
Dust baking sheet with semolina flour or cornmeal to prevent soggy bottoms and add crunch. Keep fillings dry to avoid sogginess. Seal edges firmly with a fork to prevent leaks. Egg wash gives a golden, shiny crust but can be substituted with olive oil. Freeze pockets flat in a single layer before bagging to prevent sticking. Reheat in oven or air fryer for best crispness; avoid microwaving.
Nutrition
- Serving Size: 1 pizza pocket
- Calories: 275
- Sugar: 3
- Sodium: 450
- Fat: 12
- Saturated Fat: 5
- Carbohydrates: 30
- Fiber: 2
- Protein: 12
Keywords: pizza pockets, freezer meals, make-ahead, crispy pizza pockets, easy pizza recipe, quick dinner, freezer-friendly, homemade pizza pockets