It was 10:47 PM on a particularly drizzly Tuesday, and I had a sudden, fierce need for a warm, yeasty roll. Not a store-bought one, not the kind from a can that pops open—I wanted the real, pillowy, buttery kind that you have to wait for. The problem? I was out of bread flour, my arms were tired from a long day, and the thought of kneading dough for ten minutes felt like a marathon I wasn’t signed up for.
I stared into my pantry like it held the answers to the universe. All-purpose flour? Yes. Yeast? Thankfully, yes. Honey? A half-full bottle. And then it hit me—I didn’t need to knead. I mean, honestly, who decided that sore arms were a prerequisite for good bread? I remembered a technique I’d read about ages ago, where you just stir everything together, let time do the work, and bake. It felt like a cheat code, but that night, I was all in.
I mixed a shaggy, sticky dough, covered the bowl with a damp towel, and left it on the counter. I almost forgot about it while scrolling my phone, but the next morning, the smell coming from the kitchen was something else. The dough had doubled, bubbly and alive. I shaped the rolls, let them rise again, and baked them off. The first bite was one of those moments—you know the one—where you just stop and close your eyes. The honey butter glaze was the final touch, making the tops all shiny and sweet. This recipe stayed with me because it proved that you don’t need fancy ingredients or a workout to get incredible, fluffy dinner rolls. You just need a little patience and a good story to go with them.
Why You’ll Love This Recipe
Let’s be real for a second. There are a million dinner roll recipes out there, but this one is different. It’s the one I now make for every holiday, every potluck, and honestly, for random Tuesdays when I need a carb hug. Here’s why it’s become my absolute go-to:
- No Kneading Required: This is the star of the show. You don’t need a stand mixer or Popeye forearms. Just a bowl and a spoon. The dough does the work while you do literally anything else.
- Simple Pantry Ingredients: You probably have all of this right now. Flour, yeast, milk, butter, honey, salt, an egg. No trips to a specialty store for weird flours or hard-to-find extracts.
- Foolproof for Beginners: I’ve tested this with my sister, who once set a timer for “toast” instead of “bake,” and they came out perfect. The high hydration dough is very forgiving.
- Unbelievably Fluffy & Soft: The texture is what dreams are made of. They’re light as a cloud, with a slight pull-apart shred that’s just *chef’s kiss*. The honey butter on top adds a subtle sweetness that doesn’t overpower.
- Perfect for Any Occasion: Thanksgiving dinner? Yes. A simple weeknight soup? Absolutely. A fancy brunch spread? You bet. They’re the little black dress of the bread world.
This isn’t just another roll recipe. The secret is the high hydration and the long, slow rise. It develops flavor and gluten without you lifting a finger. It’s the kind of recipe that makes you look like a rockstar with zero stress. That first bite, with the soft crumb and the sweet, salty butter—it’s pure comfort food magic.
What Ingredients You Will Need
This recipe relies on a handful of basic ingredients to create something truly special. The magic is in the technique, not a long list of exotic items. Here’s everything you need and a few notes on how to pick the best ones.
- All-Purpose Flour: 3 ½ cups (440g). I use Gold Medal or King Arthur. Don’t use bread flour here—it will make the rolls tougher. All-purpose keeps them tender. Spoon and level your flour for accuracy; scooping directly from the bag packs in too much.
- Warm Milk: 1 cup (240ml), heated to about 110°F (43°C). Whole milk gives the richest flavor, but 2% works great too. The warmth is crucial to wake up the yeast. If it’s too hot, it will kill the yeast; too cold, and they’ll take forever to rise.
- Active Dry Yeast: 2 ¼ teaspoons (one ¼-ounce packet). I prefer Red Star or Fleischmann’s. You can use instant yeast, but you won’t need to proof it first—just mix it with the flour.
- Honey: ¼ cup (85g). This is for the dough and the glaze. Use a mild honey like clover or wildflower. Stronger honey, like buckwheat, will change the flavor profile.
- Unsalted Butter: 6 tablespoons (85g), melted and slightly cooled, plus 2 tablespoons for the topping. Using unsalted lets you control the salt level. If you only have salted, just reduce the added salt by ¼ teaspoon.
- Large Egg: 1, at room temperature. It adds richness and helps with structure. If you forget to take it out of the fridge, place it in a bowl of warm water for 5 minutes.
- Salt: 1 ½ teaspoons. I use fine sea salt. Salt controls the yeast’s activity and enhances flavor. Don’t skip it!
Equipment Needed
You don’t need a fancy bakery setup for these rolls. Most of this is standard kitchen gear. Here’s what you’ll want to have on hand.
- Large Mixing Bowl: A good-sized bowl is key for mixing and letting the dough rise. I use a big ceramic one, but glass or stainless steel works fine.
- Wooden Spoon or Spatula: For the initial mixing. A stiff silicone spatula is my favorite because it scrapes the sides clean.
- Plastic Wrap or a Clean Kitchen Towel: To cover the dough while it rises. Make sure it’s damp if using a towel, so a skin doesn’t form on the dough.
- 9×13-inch Baking Dish: I love my light-colored metal pan for even browning. Glass or ceramic works too, but you might need to add 3-5 minutes to the bake time.
- Parchment Paper: Not strictly necessary, but it makes cleanup a breeze. If you don’t use it, make sure to grease the pan well.
- Small Saucepan or Microwave-Safe Bowl: For melting the butter for the dough and the glaze.
- Pastry Brush: For brushing the honey butter on the hot rolls. A silicone one is easy to clean.
I once tried to use a metal spoon that was too small, and the dough climbed up my wrist. Honestly, a good, sturdy spatula is worth its weight in gold here. If you don’t have a pastry brush, you can just drizzle the butter over the rolls with a spoon—it’s not as pretty, but it tastes the same.
Preparation Method
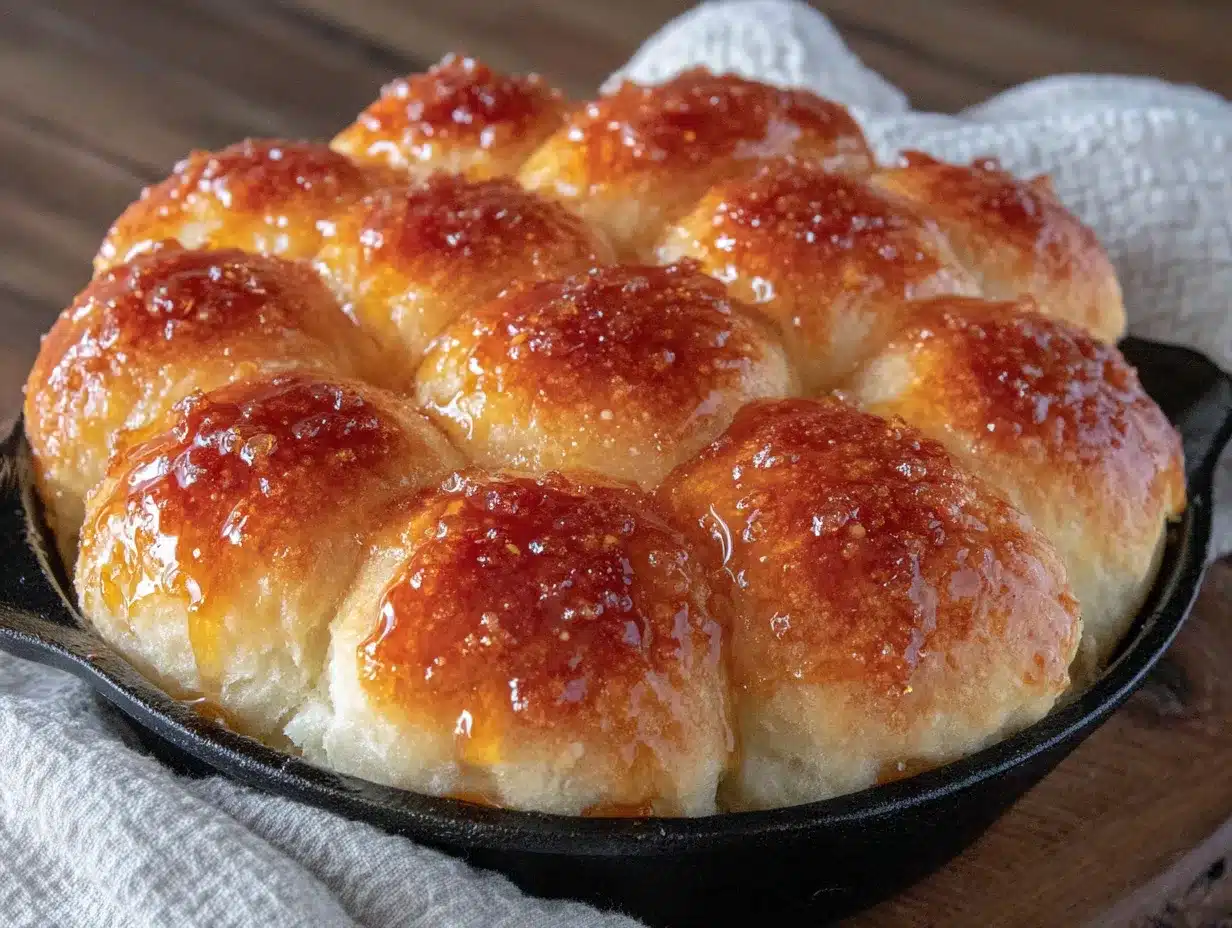
This is the fun part. Follow these steps, and you’ll have a pan of golden, fluffy rolls that will disappear in minutes. The key is to trust the process, especially the no-knead part.
- Proof the Yeast: In your large mixing bowl, combine the warm milk (110°F) and 1 tablespoon of the honey. Sprinkle the yeast on top and give it a gentle stir. Let it sit for 5-10 minutes until it’s foamy and smells like bread. If it doesn’t foam, your milk was too hot or your yeast is dead. Start over—it’s worth it.
- Mix the Dough: Add the remaining honey, the melted butter (cooled slightly), the egg, and the salt to the yeast mixture. Whisk to combine. Then, add the flour all at once. Stir with your wooden spoon or spatula until a shaggy, sticky dough forms. There should be no dry patches of flour. It will look ugly and lumpy—that’s perfect.
- The First Rise (Bulk Fermentation): Cover the bowl tightly with plastic wrap or a damp towel. Let it sit in a warm, draft-free place for 1 ½ to 2 hours, or until it has doubled in size. My favorite spot is inside my (turned-off) oven with the light on. The dough should be bubbly and jiggly.
- Deflate and Shape: Lightly flour your work surface and your hands. Turn the dough out onto the surface. It will be very sticky, so don’t be shy with the flour. Gently pat the dough into a rough rectangle, about 8×10 inches. Don’t punch it down hard—you want to keep some of those air bubbles.
- Cut the Rolls: Using a bench scraper or a sharp knife, cut the dough into 12 equal pieces. I usually cut it in half, then each half into thirds, and then each third in half. A kitchen scale is helpful here for even rolls, but eyeballing it works too.
- Shape the Rolls: Take one piece of dough. Fold the edges into the center to form a rough ball. Then, flip it over so the seam is on the bottom. Cup your hand over the ball and roll it gently on the work surface in a circular motion until it’s a smooth, tight ball. Place it in your greased 9×13 baking dish. Repeat with the remaining dough, arranging them in a 3×4 grid.
- The Second Rise: Cover the pan loosely with plastic wrap (spray it with cooking spray first so it doesn’t stick to the rolls). Let them rise for another 45-60 minutes, until they are puffy and have nearly doubled in size and are touching each other. They should look like little pillows.
- Preheat and Bake: About 20 minutes before the second rise is done, preheat your oven to 375°F (190°C). Bake the rolls on the center rack for 18-22 minutes, or until they are golden brown on top and sound hollow when you tap them. If they are browning too fast, tent them with foil after 15 minutes.
- Make the Honey Butter Glaze: While the rolls are baking, melt the remaining 2 tablespoons of butter in a small bowl. Stir in 1 tablespoon of honey until combined.
- Glaze and Serve: The moment the rolls come out of the oven, brush the hot honey butter all over the tops. Let them cool in the pan for 5-10 minutes before serving. The smell is intoxicating.
Cooking Tips & Techniques
I’ve made these rolls probably twenty times now, and I’ve learned a few things the hard way. Here are my best tips to make sure your first batch is perfect.
- Don’t Skip the Yeast Proof: I know it seems like an extra step, but it’s your insurance policy. If your yeast is dead, you’ll waste all that flour and time. A foamy top means you’re good to go.
- Wet Hands are Your Friend: When shaping the rolls, if the dough is sticking to your fingers like crazy, just wet your hands slightly with water. It works better than flour and doesn’t dry out the dough.
- Trust the Sticky Dough: No-knead dough is intentionally wet and sticky. This high hydration is what creates those big, airy pockets and the super soft texture. Resist the urge to add too much flour during shaping. A little stickiness is a good thing.
- Even Sizing Matters: Try to make the rolls as uniform as possible. If some are much bigger than others, they’ll bake unevenly. The smaller ones will be overdone while the bigger ones are still doughy in the center.
- Check for Doneness: An instant-read thermometer is the most reliable tool here. The internal temperature of a perfectly baked roll should be 190-200°F (88-93°C). If you don’t have one, the hollow sound test works well.
- My Biggest Failure: The first time I made these, I forgot the salt. The rolls rose like crazy, but they tasted flat and almost sweet in a weird way. Salt isn’t just for flavor; it strengthens the gluten structure. Don’t skip it!
Variations & Adaptations
Once you master the basic recipe, the fun really begins. Here are a few ways I’ve played around with these rolls to keep things interesting.
- Savory Herb Rolls: Before adding the flour, stir in 2 teaspoons of dried rosemary, 1 teaspoon of garlic powder, and ½ teaspoon of black pepper. The honey butter glaze still works beautifully with the herbs, creating a sweet-savory roll that’s incredible with roasted chicken.
- Whole Wheat Version: Substitute 1 cup of the all-purpose flour with whole wheat flour. The rolls will be a bit denser and earthier. You might need to add an extra tablespoon of milk, as whole wheat flour absorbs more liquid. They are still fluffy, just heartier.
- Cheesy Garlic Pull-Aparts: After shaping the rolls and placing them in the pan, tuck small cubes of mozzarella or cheddar between the rolls. For the glaze, skip the honey and mix the melted butter with 2 minced garlic cloves and a pinch of parsley. Bake as directed.
- Cinnamon Sugar Sweet Rolls: After the first rise, roll the dough out into a rectangle, brush with softened butter, and sprinkle with a mixture of cinnamon and brown sugar. Roll it up, cut into 12 slices, and place them in the pan cut-side up. Omit the honey butter glaze and use a simple cream cheese glaze instead.
- Vegan Adaptation: Use warm oat milk or almond milk, replace the egg with a flax egg (1 tablespoon ground flaxseed + 3 tablespoons water), and use vegan butter. The texture will be slightly less rich, but they still come out wonderfully fluffy.
Serving & Storage Suggestions
These rolls are best served warm, right out of the oven, with a generous swipe of that honey butter glaze. But they’re also fantastic the next day, if they last that long.
- Serving Temperature: Serve them warm. The butter is melted, the crumb is soft, and the honey is fragrant. If you’ve made them ahead, reheat them in a 300°F (150°C) oven for 5-7 minutes.
- What to Serve With Them: They are the perfect side for a big bowl of hearty beef stew or a simple creamy tomato basil soup. They also make incredible mini sandwiches for leftover turkey or ham.
- Storage: Store leftover rolls in an airtight container at room temperature for up to 3 days. The honey butter will keep them moist. Do not refrigerate them, as that will dry them out faster.
- Freezing Instructions: These freeze like a dream. Let the baked rolls cool completely. Wrap the entire pan tightly in plastic wrap, then a layer of aluminum foil. Freeze for up to 3 months. To thaw, let them sit at room temperature for a few hours, then reheat in the oven.
- Flavor Development: Honestly, I think the rolls are even better the next day. The flavors meld together, and the honey butter soaks into the top layer, making it slightly chewy and caramelized. Don’t be afraid to make them a day ahead.
Nutritional Information & Benefits
Let’s be honest—these are a treat. But knowing a little about what’s in them helps you enjoy them without guilt. Here’s a rough estimate per roll (based on 12 servings).
- Calories: Approximately 220-250 calories per roll.
- Carbohydrates: 35g. The main source is the flour and honey, providing quick energy.
- Protein: 5g. The egg and milk add a small protein boost.
- Fat: 8g. Primarily from the butter, which adds richness and helps with satiety.
- Key Benefits: Honey is a natural sweetener with trace antioxidants. The milk and butter provide calcium and vitamin A. Plus, there’s the simple, undeniable benefit of homemade comfort food—it’s good for the soul.
- Dietary Considerations: This recipe is vegetarian. For a lower-fat option, you can reduce the butter in the dough to 4 tablespoons, but the rolls will be slightly less tender. For a vegan version, see the variations section.
Conclusion
These Fluffy No-Knead Honey Butter Dinner Rolls are more than just a recipe—they’re a little bit of magic you can create in your own kitchen. They prove that you don’t need a lot of skill or fancy tools to make something truly incredible. You just need a little time, a few simple ingredients, and the willingness to trust a sticky dough.
I love this recipe because it’s the one that made me feel like a real baker. It’s forgiving, it’s reliable, and it always, always makes people happy. The way the kitchen smells, the way the tops shine, the way they pull apart in soft, steamy strands—it’s pure joy.
Now it’s your turn. I want to see your beautiful rolls! Did you try a variation? Did you serve them with something amazing? Drop a comment below and tell me all about it. And if you loved this recipe, please share it with a friend who needs a little bread in their life. Happy baking!
Frequently Asked Questions
Can I use instant yeast instead of active dry yeast?
Yes, absolutely. If using instant yeast, you can skip the proofing step. Just mix it directly with the flour. The rise times might be slightly shorter, so keep an eye on the dough.
My dough is very sticky. Is that normal?
Yes! That’s the whole point of a no-knead recipe. The high hydration is what creates the fluffy texture. Use wet hands or a little flour on your surface to shape it, but don’t add too much extra flour to the dough itself.
Can I make the dough ahead of time?
Yes, you can. After the first rise, you can deflate the dough, cover it tightly, and refrigerate it for up to 24 hours. The cold will slow down the fermentation, and you can shape and bake them the next day. Let the shaped rolls come to room temperature before the second rise.
Why did my rolls turn out dense and heavy?
This usually happens for one of three reasons: the yeast was dead (it didn’t foam), you added too much flour during shaping, or the dough didn’t rise long enough. Make sure your milk is warm (not hot) and be patient with the rise times.
Can I freeze the unbaked rolls?
Yes. After shaping the rolls and placing them in the pan, do not let them do the second rise. Cover the pan tightly and freeze. When you’re ready to bake, let them thaw and rise in the pan for several hours at room temperature, then bake as directed.
PrintEasy Fluffy No-Knead Honey Butter Dinner Rolls Recipe
These no-knead honey butter dinner rolls are incredibly soft, fluffy, and easy to make with simple pantry ingredients. Perfect for holidays, potlucks, or any night you need a warm, comforting bread.
- Prep Time: 20 minutes
- Cook Time: 20 minutes
- Total Time: 2 hours 40 minutes (includes rising time)
- Yield: 12 rolls 1x
- Category: Bread
- Cuisine: American
Ingredients
- 3 ½ cups (440g) all-purpose flour
- 1 cup (240ml) warm milk (about 110°F/43°C)
- 2 ¼ teaspoons active dry yeast (one ¼-ounce packet)
- ¼ cup (85g) honey, divided (1 tablespoon for proofing, remaining for dough and glaze)
- 6 tablespoons (85g) unsalted butter, melted and slightly cooled, plus 2 tablespoons for topping
- 1 large egg, at room temperature
- 1 ½ teaspoons fine sea salt
Instructions
- Proof the Yeast: In a large mixing bowl, combine the warm milk (110°F) and 1 tablespoon of the honey. Sprinkle the yeast on top and give it a gentle stir. Let it sit for 5-10 minutes until it is foamy and smells like bread. If it doesn’t foam, start over.
- Mix the Dough: Add the remaining honey, the melted butter (cooled slightly), the egg, and the salt to the yeast mixture. Whisk to combine. Then, add the flour all at once. Stir with a wooden spoon or spatula until a shaggy, sticky dough forms with no dry patches.
- First Rise (Bulk Fermentation): Cover the bowl tightly with plastic wrap or a damp towel. Let it sit in a warm, draft-free place for 1 ½ to 2 hours, or until it has doubled in size and is bubbly and jiggly.
- Deflate and Shape: Lightly flour your work surface and hands. Turn the dough out onto the surface. Gently pat it into a rough rectangle, about 8×10 inches. Do not punch it down hard.
- Cut the Rolls: Using a bench scraper or sharp knife, cut the dough into 12 equal pieces. A kitchen scale helps for even rolls.
- Shape the Rolls: Take one piece of dough. Fold the edges into the center to form a rough ball, then flip it over so the seam is on the bottom. Cup your hand over the ball and roll it gently on the work surface in a circular motion until smooth and tight. Place in a greased 9×13-inch baking dish. Repeat with remaining dough, arranging in a 3×4 grid.
- Second Rise: Cover the pan loosely with plastic wrap (sprayed with cooking spray to prevent sticking). Let rise for 45-60 minutes until puffy, nearly doubled, and touching each other.
- Preheat and Bake: About 20 minutes before the second rise is done, preheat oven to 375°F (190°C). Bake on the center rack for 18-22 minutes, until golden brown and hollow-sounding when tapped. If browning too fast, tent with foil after 15 minutes.
- Make the Honey Butter Glaze: While rolls bake, melt the remaining 2 tablespoons of butter in a small bowl. Stir in 1 tablespoon of honey until combined.
- Glaze and Serve: As soon as rolls come out of the oven, brush the hot honey butter glaze all over the tops. Let cool in the pan for 5-10 minutes before serving.
Notes
No-knead dough is intentionally sticky; resist adding too much flour. For even baking, make rolls uniform in size. Internal temperature should reach 190-200°F (88-93°C). Rolls can be made ahead: after first rise, refrigerate shaped rolls for up to 24 hours, then let come to room temperature before second rise. Freeze baked rolls for up to 3 months.
Nutrition
- Serving Size: 1 roll
- Calories: 235
- Sugar: 8
- Sodium: 300
- Fat: 8
- Saturated Fat: 5
- Carbohydrates: 35
- Fiber: 1
- Protein: 5
Keywords: dinner rolls, no-knead rolls, honey butter rolls, fluffy rolls, easy bread recipe, homemade rolls



