Introduction
“I wasn’t planning on making dessert that afternoon,” I confess, “but sometimes the best recipes come from unexpected moments.” It was a lazy Sunday, the kind where the afternoon light spills lazily through the kitchen window and you’re just hanging around, not really hungry but craving something sweet. I had a few overripe bananas sitting on the counter, and a box of Nilla Wafers that had been waiting patiently in the pantry. Honestly, I was just about to toss the bananas when a memory hit me — a quick chat I had with my neighbor, Mrs. Jenkins, about her famous banana pudding.
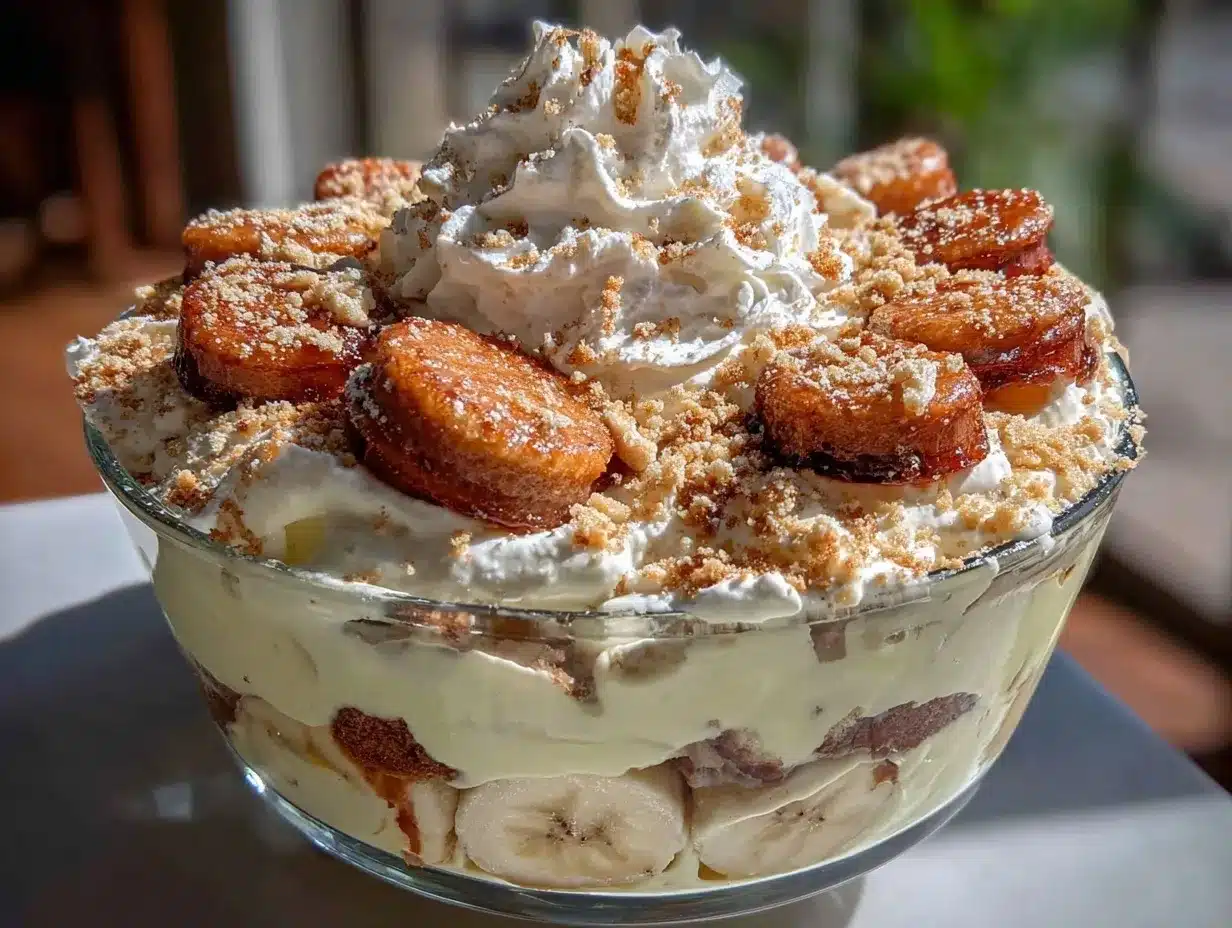
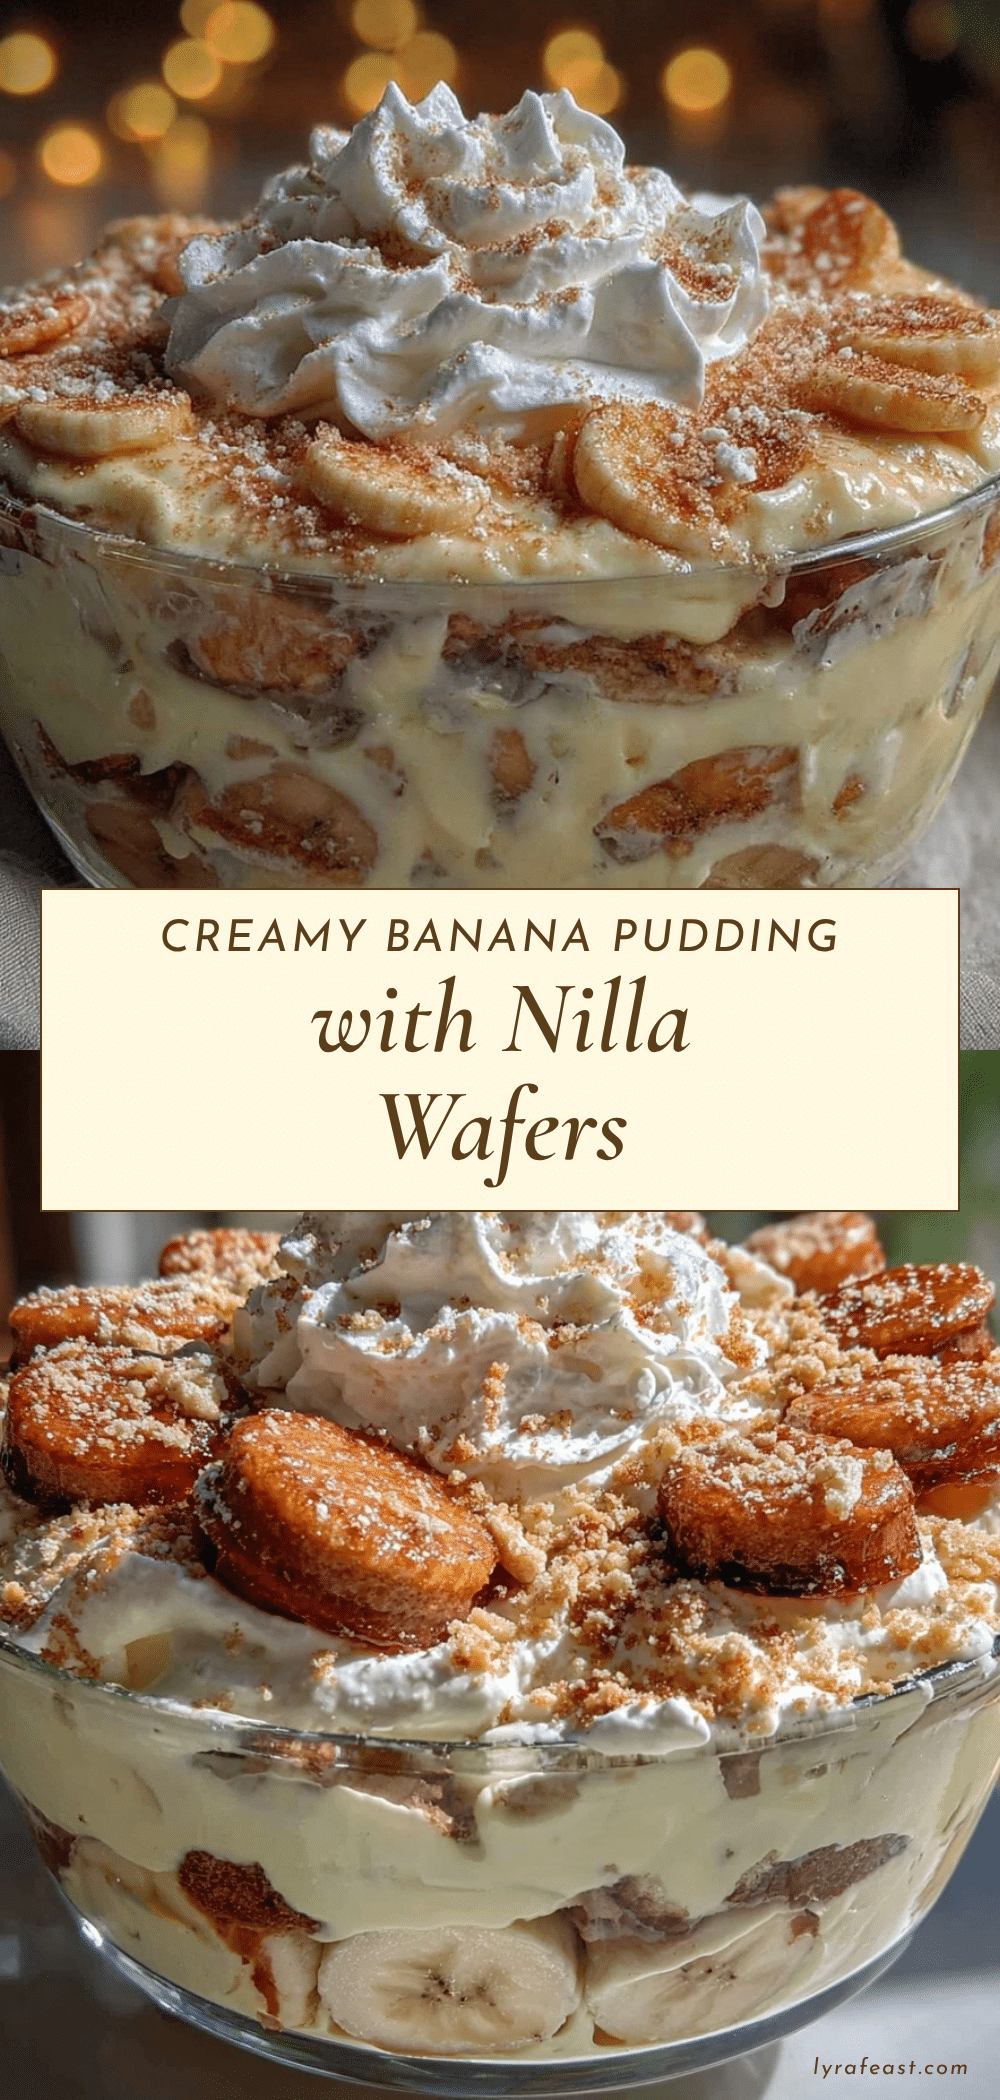
She swore by a simple combination of creamy pudding, fresh whipped cream, and those classic Nilla Wafers. I mean, I’d tried banana pudding before, but hers had this silky, dreamy texture that kept me thinking. So, I gave it a shot, mixing up the pudding with a homemade touch, layering it with the wafers and sliced bananas, then topping it all with freshly whipped cream. The first bite? Pure comfort food magic. Maybe you’ve been there — craving something nostalgic but needing it to feel fresh and homemade. This creamy banana pudding with Nilla Wafers and fresh whipped cream quickly became my go-to dessert, the kind that feels like a warm hug after a long day.”
Why You’ll Love This Recipe
This creamy banana pudding recipe isn’t just another sweet treat — it’s a blend of tried-and-true comfort and fresh, homemade goodness. After making it dozens of times (and trust me, I’ve tested everything from instant pudding mixes to scratch recipes), this version hits the perfect balance of creamy, sweet, and crunchy.
- Quick & Easy: Comes together in under 30 minutes, perfect for busy weeknights or when you need a last-minute dessert.
- Simple Ingredients: Uses pantry basics and fresh bananas — no fancy or hard-to-find items required.
- Perfect for Gatherings: A crowd-pleaser that shines at potlucks, family dinners, or casual brunches.
- Crowd-Pleaser: Kids love the sweet layers, and adults appreciate the fresh whipped cream topping that adds an elegant touch.
- Unbelievably Delicious: The creamy pudding combined with the crisp Nilla Wafers and fresh banana slices creates a texture and flavor combo that’s genuinely satisfying.
This isn’t your average banana pudding — it’s got that homemade charm with a silky smoothness that only fresh whipped cream can bring. Plus, I like to think it’s a dessert that makes you pause and really savor each bite (especially when you’re sitting around good company). If you want a recipe that’s both approachable and impressive, this is it.
What Ingredients You Will Need
This recipe uses simple, wholesome ingredients to deliver bold flavor and satisfying texture without fuss. Most are pantry staples you likely already have, along with fresh bananas for that natural sweetness and freshness.
- For the Pudding:
- 2 cups whole milk (480 ml) – I prefer whole milk for creaminess, but 2% works too
- 3/4 cup granulated sugar (150 g) – balances the pudding’s sweetness
- 1/3 cup all-purpose flour (40 g) – acts as the thickening agent; you can substitute cornstarch for gluten-free
- 1/4 teaspoon salt – enhances flavor
- 4 large egg yolks, room temperature – essential for richness and silky texture
- 2 tablespoons unsalted butter, softened (about 28 g) – adds smoothness
- 1 1/2 teaspoons pure vanilla extract – for that warm, comforting aroma
- For the Layers:
- 3-4 ripe bananas, sliced (about 2 cups) – choose bananas with a bit of brown spots for natural sweetness
- 1 box Nilla Wafers (about 11 oz or 312 g) – classic and perfect for layering; you can try gluten-free vanilla wafers if needed
- For the Fresh Whipped Cream:
- 1 cup heavy cream (240 ml), cold – cold cream whips up better, trust me
- 2 tablespoons powdered sugar (15 g) – balances the cream’s richness
- 1/2 teaspoon vanilla extract – adds subtle flavor
For best results, I recommend using a trusted brand like Horizon Organic milk and Land O’Lakes butter. When selecting bananas, avoid those too green or overly mushy. If you want to make it dairy-free, swap the milk and cream for coconut-based alternatives, and use a dairy-free butter substitute — it’s surprisingly good!
Equipment Needed
- Medium-sized saucepan – for cooking the pudding smoothly without scorching
- Whisk – essential for mixing the pudding ingredients to avoid lumps
- Mixing bowls – one for the pudding base and another chilled bowl for whipping cream
- Electric mixer or stand mixer – this makes whipping the cream effortless, but a hand whisk works if you have the patience
- 9×9 inch (23×23 cm) glass or ceramic baking dish – perfect size for layering pudding and wafers
- Spatula – for folding the whipped cream and spreading layers evenly
If you don’t have a stand mixer, I’ve whipped cream by hand many times, and it’s definitely a good arm workout! For budget-friendly options, a simple stainless steel whisk and a sturdy saucepan will do just fine. Just make sure your bowls for whipping cream are chilled to help it whip up faster.
Preparation Method
- Make the pudding base: In a medium saucepan, whisk together the sugar, flour, and salt until well combined.
Slowly add the milk, whisking continuously to avoid lumps. Place the pan over medium heat. - Cook and thicken: Stir constantly as the mixture heats, scraping the sides and bottom with a spatula. After about 5-7 minutes, the pudding will begin to thicken — you’ll notice it getting creamy and smooth. Don’t rush; patience here means no grainy texture.
- Temper the egg yolks: In a small bowl, lightly beat the egg yolks. Gradually pour about 1/2 cup (120 ml) of the hot pudding mixture into the yolks, whisking constantly to raise their temperature without scrambling them.
- Combine and finish cooking: Pour the yolk mixture back into the saucepan, stirring constantly. Cook for another 2-3 minutes until the pudding thickens further (it should coat the back of a spoon). Remove from heat and stir in the butter and vanilla extract until melted and smooth.
- Cool the pudding: Transfer the pudding to a clean bowl, cover with plastic wrap pressed directly onto the surface to prevent a skin from forming. Chill in the refrigerator for at least 1 hour.
- Prepare the whipped cream: In a chilled mixing bowl, beat the heavy cream, powdered sugar, and vanilla on medium-high speed until soft peaks form. Set aside in the fridge.
- Assemble the pudding: In your baking dish, start with a layer of Nilla Wafers, then a layer of sliced bananas, followed by a layer of pudding. Repeat layers until you run out of pudding or dish space, ending with pudding on top.
- Top with whipped cream: Spread the fresh whipped cream evenly over the top layer of pudding. For a little extra flair, sprinkle a few crushed Nilla Wafers or banana slices on top.
- Chill before serving: Refrigerate the assembled banana pudding for at least 2 hours or overnight to allow flavors to meld and wafers to soften slightly (but not soggy!).
Pro tip: When slicing bananas, do it just before assembling to keep them from browning too fast. Also, if your pudding feels too thick after chilling, a quick whisk before layering can bring it back to silky perfection. I learned that the hard way after one batch turned a bit stiff!
Cooking Tips & Techniques
Getting that creamy, smooth pudding texture is all about gentle heat and constant stirring. Never leave the pudding unattended on the stove — I learned this the hard way when a batch scorched because I got distracted by a phone call. Using a whisk rather than a spoon helps break up lumps early on.
When tempering the eggs, slow but steady is the name of the game. Pour the hot pudding mixture into the yolks gradually while whisking fast to avoid scrambled eggs. If the pudding feels grainy after cooking, a quick blend with an immersion blender can fix it.
Whipping cream works best when it’s cold and your bowl is chilled. If you’re short on time, pop the bowl and beaters in the freezer for 10-15 minutes before whipping. Overwhipping cream turns it buttery, so stop once you get soft peaks that hold shape but still look fluffy.
Layer your pudding just before serving to keep the Nilla Wafers from getting too soggy. And remember, the pudding thickens as it cools — if it’s too runny while warm, give it a bit more time on the stove.
Variations & Adaptations
- Dietary swap: Use almond or oat milk with a thickening agent like cornstarch for a dairy-free version. Coconut whipped cream is a fantastic substitute for fresh cream.
- Flavor twists: Add a tablespoon of instant espresso powder to the pudding for a mocha banana pudding, or swirl in a bit of peanut butter for a nutty surprise.
- Seasonal touch: In summer, toss in fresh berries like strawberries or blueberries between layers for a fruity burst that pairs beautifully with banana.
- Different wafers: Swap Nilla Wafers for graham crackers or ginger snaps for a spicier, crunchier texture.
- Personal favorite: I once tried folding in finely chopped toasted pecans into the whipped cream layer — it added a lovely crunch and nutty depth that made the pudding even more special.
Serving & Storage Suggestions
This banana pudding is best served chilled, straight from the fridge. Presentation-wise, a clear glass dish lets the beautiful layers shine through, which always gets compliments. For a simple garnish, add a few banana slices or crushed Nilla Wafers on top just before serving.
It pairs wonderfully with a cup of strong coffee or a light dessert wine if you’re hosting. For a summer twist, serve alongside fresh berries or a scoop of vanilla ice cream.
Store leftover pudding covered tightly in the refrigerator for up to 3 days. The flavors deepen overnight, but the wafers will soften further, so if you prefer crunch, assemble closer to serving time. You can freeze the pudding, but whipped cream texture changes, so I recommend freezing just the pudding base if needed.
Reheat gently on the stove if you want warm pudding — just avoid heating the whipped cream topping.
Nutritional Information & Benefits
Each serving of this creamy banana pudding provides a satisfying mix of carbohydrates for energy, a moderate amount of protein from eggs and milk, and healthy fats from butter and cream. Bananas add potassium, vitamin B6, and dietary fiber, which support heart health and digestion.
This dessert is naturally gluten-containing due to the Nilla Wafers, but swapping to gluten-free crackers can accommodate dietary needs. It’s a moderate indulgence, with sugar content balanced by the natural sweetness of bananas.
From a wellness perspective, this recipe feels like a treat that also nourishes a little — especially when made with quality ingredients and fresh fruit. It’s a reminder that dessert doesn’t have to be complicated or overly processed to bring joy.
Conclusion
This creamy banana pudding with Nilla Wafers and fresh whipped cream is a recipe that’s stuck with me for good reasons. It’s approachable, comforting, and a little nostalgic — but with a homemade twist that makes it feel special every time. I love how it balances sweet, creamy, and crunchy textures in a way that’s just so satisfying.
Don’t be afraid to play with it, swapping ingredients or adding your own flair. I promise, once you try this recipe, it’ll become one of those desserts you reach for again and again. If you make it, I’d love to hear how you made it your own — leave a comment or share your tweaks. Let’s keep the tradition of good food and good company going strong!
FAQs
Can I make this banana pudding ahead of time?
Yes! It actually tastes better after chilling for a few hours or overnight. Just keep it covered tightly and add the whipped cream topping just before serving for best texture.
What can I use if I don’t have Nilla Wafers?
Graham crackers, vanilla cookies, or even crushed digestive biscuits work well as substitutes. Just choose something mildly sweet and crisp.
How do I prevent the bananas from browning?
Slice them just before assembling and layer quickly. You can also lightly brush them with lemon juice to slow browning.
Is there a way to make this recipe gluten-free?
Absolutely! Use gluten-free vanilla wafers or crackers and make sure your flour substitute (like cornstarch or gluten-free flour) is safe for your needs.
Can I use store-bought pudding instead of making it from scratch?
Sure, but homemade pudding gives you a richer, less artificial flavor and a creamier texture. If you’re short on time, a high-quality instant pudding mix can be a good shortcut.
On a final note, if you enjoy this dessert, you might appreciate the crispy garlic chicken recipe I shared recently — it’s another crowd-pleaser perfect for easy dinners. Also, for other easy homemade dessert ideas, take a peek at my easy chocolate mousse recipe that’s divine!
Pin This Recipe!
Creamy Banana Pudding Recipe with Nilla Wafers and Fresh Whipped Cream

A nostalgic and comforting homemade banana pudding layered with creamy pudding, fresh bananas, crisp Nilla Wafers, and topped with fresh whipped cream. Perfect for gatherings and easy to make in under 30 minutes.
- Prep Time: 15 minutes
- Cook Time: 15 minutes
- Total Time: 2 hours 30 minutes
- Yield: 8 servings 1x
- Category: Dessert
- Cuisine: American
Ingredients
- 2 cups whole milk (480 ml)
- 3/4 cup granulated sugar (150 g)
- 1/3 cup all-purpose flour (40 g)
- 1/4 teaspoon salt
- 4 large egg yolks, room temperature
- 2 tablespoons unsalted butter, softened (about 28 g)
- 1 1/2 teaspoons pure vanilla extract
- 3–4 ripe bananas, sliced (about 2 cups)
- 1 box Nilla Wafers (about 11 oz or 312 g)
- 1 cup heavy cream (240 ml), cold
- 2 tablespoons powdered sugar (15 g)
- 1/2 teaspoon vanilla extract
Instructions
- In a medium saucepan, whisk together sugar, flour, and salt until well combined. Slowly add milk, whisking continuously to avoid lumps. Place pan over medium heat.
- Stir constantly as mixture heats, scraping sides and bottom with a spatula. After 5-7 minutes, pudding will begin to thicken and become creamy and smooth.
- In a small bowl, lightly beat egg yolks. Gradually pour about 1/2 cup (120 ml) of hot pudding mixture into yolks, whisking constantly to temper without scrambling.
- Pour yolk mixture back into saucepan, stirring constantly. Cook another 2-3 minutes until pudding thickens further and coats the back of a spoon. Remove from heat and stir in butter and vanilla extract until melted and smooth.
- Transfer pudding to a clean bowl, cover with plastic wrap pressed onto surface to prevent skin formation. Chill in refrigerator for at least 1 hour.
- In a chilled mixing bowl, beat heavy cream, powdered sugar, and vanilla on medium-high speed until soft peaks form. Set aside in fridge.
- In a 9×9 inch baking dish, layer Nilla Wafers, sliced bananas, and pudding. Repeat layers until pudding or dish space is used, ending with pudding on top.
- Spread fresh whipped cream evenly over top layer of pudding. Optionally sprinkle crushed Nilla Wafers or banana slices on top.
- Refrigerate assembled pudding for at least 2 hours or overnight to allow flavors to meld and wafers to soften slightly.
Notes
Slice bananas just before assembling to prevent browning. Chill bowls and beaters before whipping cream for best results. Use gentle heat and constant stirring to avoid lumps and scorching. For dairy-free, substitute milk and cream with coconut-based alternatives and use dairy-free butter. Pudding thickens as it cools; whisk if too thick before layering.
Nutrition
- Serving Size: 1 cup serving
- Calories: 320
- Sugar: 28
- Sodium: 150
- Fat: 15
- Saturated Fat: 9
- Carbohydrates: 40
- Fiber: 2
- Protein: 5
Keywords: banana pudding, creamy dessert, Nilla Wafers, homemade pudding, whipped cream, easy dessert, layered pudding