“You really think peanut butter and chocolate should be an Easter thing?” my friend Lisa asked, raising an eyebrow as I pulled out a slightly cracked mixing bowl from the cupboard. It was a chilly Thursday afternoon just a week before Easter, and honestly, I was a bit frazzled trying to whip up something festive yet simple. I wasn’t expecting this recipe to come together so quickly—or to cause such a mess on my countertop!
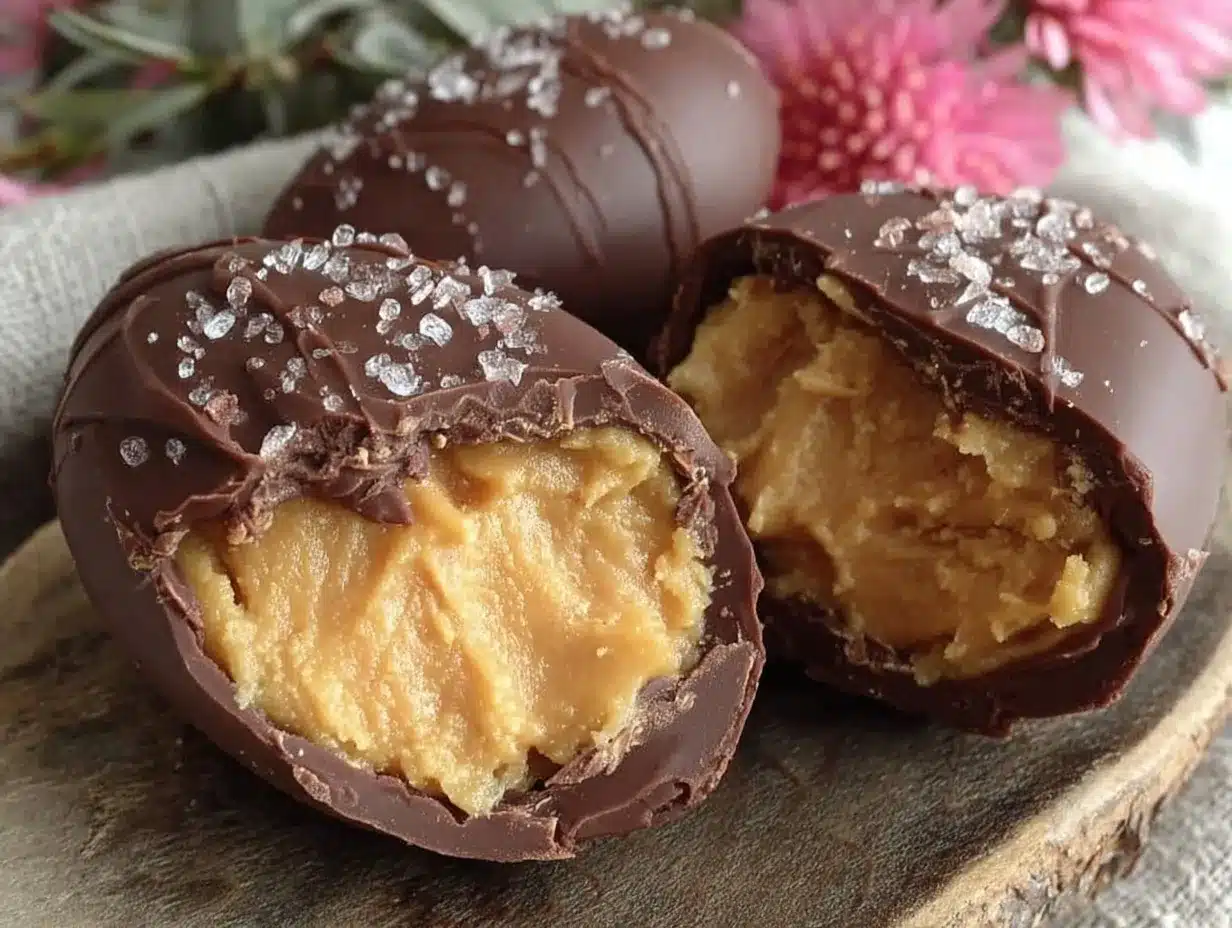
It all started when I found myself craving something rich and nostalgic but with a twist—something that reminded me of those classic peanut butter cups but shaped like adorable Easter eggs. I’d been fiddling around with different ideas for a homemade Easter treat, and this one was the happy accident that stuck. The creamy peanut butter filling is smooth and just a little sweet, while the chocolate shell adds that perfect snap with every bite. Let me tell you, the first time I made these, I forgot to chill the filling long enough, and it was a gooey disaster—but after a quick fix and a couple of laughs, I nailed the texture I was after.
Maybe you’ve been there—scrambling to find a festive treat that doesn’t require a dozen fancy ingredients or hours of prep. This recipe is exactly that kind of winner. It’s simple, comforting, and honestly a little addictive. I keep making these creamy peanut butter Easter eggs every year now, and they’ve become a little tradition that surprises guests and family alike. Plus, the chocolate shell coating gives it a fun, professional finish that’s just begging to be shared.
So, if you’re ready to try a recipe that feels like a secret passed down from a neighbor who just happens to be a peanut butter fanatic, you’re in the right place. Let me walk you through every step and all the little tricks I’ve picked up along the way.
Why You’ll Love This Creamy Peanut Butter Easter Eggs Recipe
Honestly, this recipe has been tested more times than I can count, and I can say with confidence it’s a keeper for several reasons:
- Quick & Easy: You can have these eggs ready in under 30 minutes, making it a lifesaver for last-minute Easter prep or spontaneous sweet cravings.
- Simple Ingredients: No need to hunt down specialty items. Chances are, you’ve got creamy peanut butter, powdered sugar, and chocolate right in your pantry.
- Perfect for Easter Celebrations: Whether it’s a family gathering, a potluck, or just a fun baking day with kids, these eggs fit right in.
- Crowd-Pleaser: The smooth peanut butter center wrapped in a crisp chocolate shell always wins over both kids and adults — and yes, I’ve seen adults sneak seconds!
- Unbelievably Delicious: The balance between creamy and crunchy textures, plus that sweet-salty combo, makes these eggs truly addictive.
What sets this recipe apart from the rest? It’s the chocolate shell coating technique I perfected after a few experiments. Instead of just dipping and hoping for the best, I use a method that creates a beautiful snap and keeps the filling protected, so your eggs hold up perfectly during those warm spring days. Plus, I recommend using high-quality semi-sweet chocolate chips from brands like Ghirardelli for that glossy, professional finish.
Honestly, making these creamy peanut butter Easter eggs feels like giving yourself a little gift — a treat that’s comforting but also just a bit fancy. If you’re looking to impress guests without fuss or just want to indulge in something nostalgic with a twist, this recipe’s got you covered.
What Ingredients You Will Need
This recipe uses simple, wholesome ingredients to deliver bold flavor and satisfying texture without the fuss. Most of these are pantry staples, and a few tips on selection will help you get the best results:
- For the Peanut Butter Filling:
- Creamy peanut butter (1 cup / 240 g) — I prefer natural peanut butter without added sugar for that authentic flavor.
- Powdered sugar (1 cup / 120 g) — sifted for smoothness and to avoid lumps.
- Unsalted butter (4 tablespoons / 56 g), softened — adds richness and helps the filling firm up.
- Vanilla extract (1 teaspoon) — for a subtle sweet note.
- Salt (a pinch) — balances the sweetness and enhances flavor.
- For the Chocolate Shell Coating:
- Semi-sweet chocolate chips (12 ounces / 340 g) — Ghirardelli or Callebaut work beautifully for shine and snap.
- Vegetable oil (1 tablespoon) — helps thin the chocolate for easier dipping and a smoother shell.
Ingredient Tips: If you want to swap for a dairy-free version, use coconut oil instead of butter and dairy-free chocolate chips. For a gluten-free treat, this recipe is naturally safe as is. In spring, you can even add a handful of crushed freeze-dried strawberries to the peanut butter for a fruity twist.
Equipment Needed
- Mixing bowls (preferably one medium and one large) — I like glass or ceramic for easy cleanup.
- Electric mixer or sturdy spoon — an electric hand mixer speeds things up but you can do it by hand if you’re patient.
- Spoon or small ice cream scoop — to portion the peanut butter filling evenly.
- Baking sheet or tray — lined with parchment paper to prevent sticking.
- Double boiler or microwave-safe bowl — for melting chocolate gently.
- Fork or dipping tool — helps coat the eggs evenly and lets excess chocolate drip off.
If you don’t have a double boiler, you can microwave the chocolate in short bursts (20 seconds at a time), stirring in between to avoid burning. For a budget-friendly option, a glass bowl over a saucepan of simmering water works just fine. Just keep an eye on the chocolate so it doesn’t seize.
Preparation Method
- Prepare the Peanut Butter Filling: In a large mixing bowl, combine the creamy peanut butter and softened unsalted butter. Beat on medium speed until smooth and creamy, about 2-3 minutes.
- Add the Sweetness: Gradually sift in the powdered sugar, mixing after each addition. This prevents lumps and ensures a silky texture. Add the vanilla extract and a pinch of salt, then beat again until fully combined and the mixture holds together nicely. This should take about 4-5 minutes.
- Chill the Mixture: Cover the bowl with plastic wrap and refrigerate the filling for at least 30 minutes. This step is crucial because it firms up the mixture, making it easier to shape.
- Shape the Eggs: Once chilled, use a small ice cream scoop or spoon to portion out the filling. Roll each portion into an egg shape with your hands, then place them on a parchment-lined baking sheet. You should get about 20-24 eggs. Pop them back into the fridge for another 15 minutes to firm up before dipping.
- Make the Chocolate Shell: Melt the semi-sweet chocolate chips with vegetable oil in a double boiler or microwave. Stir frequently until smooth and glossy. The oil thins the chocolate, helping it coat the eggs evenly and set with a nice snap.
- Dip the Eggs: Using a fork or dipping tool, carefully dip each peanut butter egg into the melted chocolate, turning to coat completely. Let excess chocolate drip back into the bowl, then place the coated egg back on the parchment paper.
- Set the Chocolate: Allow the chocolate to harden at room temperature, or speed things up by popping the tray in the refrigerator for 10-15 minutes. Once set, your creamy peanut butter Easter eggs are ready to enjoy or package as gifts!
Pro Tip: If the chocolate starts to thicken while dipping, gently reheat it to keep it smooth. Also, try not to handle the eggs too much after coating to avoid fingerprints on the shiny shell.
Cooking Tips & Techniques
Making these creamy peanut butter Easter eggs is straightforward, but a few insider tips can help you nail the texture and appearance every time.
- Consistency of Filling: The filling should be firm enough to hold shape but still creamy. If it feels too soft, add a bit more powdered sugar, a tablespoon at a time. Too dry? A tiny splash of milk or cream can soften it.
- Chocolate Tempering: While you don’t need to temper the chocolate for this recipe, warming it gently and adding a bit of oil helps achieve that glossy finish without complicated steps.
- Chilling Is Key: Don’t skip the chilling steps. They help the eggs hold together and make dipping easier, so you don’t end up with melted messes.
- Use Parchment Paper: Prevents sticking and makes cleanup a breeze. Wax paper can also work but sometimes chocolate sticks a bit more.
- Handling the Eggs: Use a fork or dipping tool for coating instead of your fingers to keep the chocolate shell smooth and shiny.
From personal experience, I learned the hard way that rushing through the chilling process just leads to frustration. Also, don’t be shy about tasting the filling mixture before shaping—it’s a sweet, peanut buttery reward that might tempt you to skip the chocolate (but don’t!).
Variations & Adaptations
This recipe is pretty flexible, so feel free to customize based on your taste or dietary needs:
- Nut-Free Version: Swap peanut butter for sunflower seed butter or soy nut butter to keep it allergy-friendly without losing creaminess.
- Flavored Fillings: Add a teaspoon of cinnamon or a splash of maple syrup to the peanut butter mix for a seasonal twist.
- White Chocolate Shell: Use white chocolate chips instead of semi-sweet for a sweeter, creamier coating. You can even tint it pastel colors with oil-based food coloring for a festive look.
- Vegan Adaptation: Use vegan butter, dairy-free powdered sugar, and dairy-free chocolate to make the recipe plant-based.
- Crunch Factor: Fold in some crushed pretzels or chopped peanuts into the filling for texture contrast.
I once added a sprinkle of flaky sea salt on top of the chocolate shell just before it set, and it was a game changer—salty and sweet in perfect harmony. Feel free to experiment and make these your own!
Serving & Storage Suggestions
These creamy peanut butter Easter eggs are best served chilled or at room temperature. The chocolate shell gives a satisfying snap, while the filling stays creamy and luscious.
- Serving: Arrange the eggs on a pretty platter or nestle them in colorful paper liners for an Easter table centerpiece. They pair wonderfully with a cup of coffee or milk.
- Storage: Store the eggs in an airtight container in the refrigerator for up to two weeks. They also freeze well—just thaw in the fridge overnight before serving.
- Reheating: No need to warm; these are best enjoyed cold or at room temperature. If the chocolate shell softens too much, pop them back in the fridge for a few minutes.
- Flavor Development: The flavors mellow and blend nicely after a day, so if you can wait, they taste even better the next day.
For a fun presentation, you can also package these creamy peanut butter Easter eggs as homemade gifts—wrapped in cellophane with a ribbon, they’re sure to delight friends and family.
Nutritional Information & Benefits
Each creamy peanut butter Easter egg (approximately 1.5 ounces / 43 grams) contains about:
| Calories | Fat | Carbohydrates | Protein |
|---|---|---|---|
| 180 | 13g (mostly healthy fats) | 12g (mostly from sugar) | 5g |
Key benefits come from the peanut butter, which offers protein, healthy monounsaturated fats, and important vitamins like vitamin E and magnesium. The dark chocolate shell adds antioxidants, too.
This recipe is naturally gluten-free and can easily be made dairy-free or vegan with simple swaps. Just keep in mind the sugar content if you’re managing blood sugar levels, but honestly, as a treat, it’s a much better option than many store-bought candies with artificial additives.
Conclusion
These creamy peanut butter Easter eggs with chocolate shell coating have become my go-to homemade Easter treat because they’re easy, delicious, and just a little bit special. They capture that perfect balance of creamy, crunchy, sweet, and salty that keeps you coming back for more. Whether you’re new to making candies or a seasoned pro, this recipe is approachable and rewarding.
Don’t hesitate to adjust the flavors and textures to your liking—maybe you’ll add a little sea salt, or try a white chocolate shell next time. I love hearing how readers put their own spin on recipes, so please share your results or questions in the comments below. It’s always a treat to connect over a shared love of peanut butter and chocolate!
Ready to make your Easter extra special? Grab your ingredients, and let’s get started!
FAQs About Creamy Peanut Butter Easter Eggs
Can I use crunchy peanut butter instead of creamy?
You can, but the texture will be chunkier and less smooth. If you like a bit of crunch, go for it! Just expect the filling to be less silky.
How long can I store these Easter eggs?
Store them in the fridge in an airtight container for up to two weeks, or freeze for up to three months. Just thaw in the fridge before enjoying.
What if my chocolate shell is dull or streaky?
This usually happens if the chocolate overheats or cools too quickly. Adding a little vegetable oil and stirring gently helps keep it shiny and smooth.
Can I make these without powdered sugar?
Powdered sugar is best for that smooth, firm filling. Granulated sugar won’t dissolve well and can make the texture gritty.
Is there a way to make these eggs nut-free?
Yes! Use sunflower seed butter or soy nut butter instead of peanut butter, and make sure your chocolate is processed in a nut-free facility if allergies are a concern.
Also, if you enjoy peanut butter treats, you might love my recipe for homemade peanut butter cups or the no-bake chocolate peanut butter bars that are perfect for anytime snacking.
Pin This Recipe!

Creamy Peanut Butter Easter Eggs Recipe Easy Homemade Chocolate Shell Coating

A quick and easy recipe for creamy peanut butter Easter eggs coated in a glossy, snap-worthy chocolate shell. Perfect for festive celebrations and simple enough for last-minute treats.
- Prep Time: 15 minutes
- Cook Time: 15 minutes
- Total Time: 30 minutes
- Yield: 20-24 eggs 1x
- Category: Dessert
- Cuisine: American
Ingredients
- 1 cup (240 g) creamy peanut butter (natural, no added sugar preferred)
- 1 cup (120 g) powdered sugar, sifted
- 4 tablespoons (56 g) unsalted butter, softened
- 1 teaspoon vanilla extract
- Pinch of salt
- 12 ounces (340 g) semi-sweet chocolate chips (Ghirardelli or Callebaut recommended)
- 1 tablespoon vegetable oil
Instructions
- In a large mixing bowl, combine the creamy peanut butter and softened unsalted butter. Beat on medium speed until smooth and creamy, about 2-3 minutes.
- Gradually sift in the powdered sugar, mixing after each addition to avoid lumps. Add the vanilla extract and a pinch of salt, then beat again until fully combined and the mixture holds together nicely, about 4-5 minutes.
- Cover the bowl with plastic wrap and refrigerate the filling for at least 30 minutes to firm up.
- Use a small ice cream scoop or spoon to portion out the filling. Roll each portion into an egg shape with your hands and place on a parchment-lined baking sheet. You should get about 20-24 eggs. Refrigerate for another 15 minutes to firm up before dipping.
- Melt the semi-sweet chocolate chips with vegetable oil in a double boiler or microwave, stirring frequently until smooth and glossy.
- Using a fork or dipping tool, carefully dip each peanut butter egg into the melted chocolate, turning to coat completely. Let excess chocolate drip off, then place the coated egg back on the parchment paper.
- Allow the chocolate to harden at room temperature or refrigerate for 10-15 minutes until set. Enjoy or package as gifts.
Notes
Chilling the filling is crucial for shaping and dipping. Use high-quality semi-sweet chocolate for best results. If chocolate thickens during dipping, gently reheat. Avoid handling eggs too much after coating to keep the shell shiny. For dairy-free, swap butter with coconut oil and use dairy-free chocolate chips. For nut-free, substitute peanut butter with sunflower seed or soy nut butter.
Nutrition
- Serving Size: Approximately 1 egg
- Calories: 180
- Sugar: 10
- Sodium: 90
- Fat: 13
- Saturated Fat: 4
- Carbohydrates: 12
- Fiber: 1
- Protein: 5
Keywords: peanut butter Easter eggs, homemade Easter candy, chocolate peanut butter eggs, easy Easter treats, no-bake peanut butter eggs