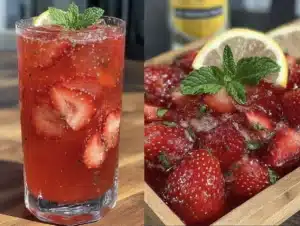
“I never thought a simple box of pink gelatin could turn into the star of my party dessert table,” I said to my friend as we were prepping for a last-minute gathering. It all started the afternoon before a neighborhood potluck when I realized I forgot to bring a dessert. Panic? Absolutely. But then, while rifling through my pantry, I spotted that bright pink gelatin packet hiding behind some canned goods. Honestly, I wasn’t expecting much, but I decided to give it a whirl with some whipped cream and a little kitchen magic.
The way those Easy Pink Gelatin Trick Layered Mousse Cups came together was almost like a happy accident. I made a bit of a mess, mostly from enthusiasm (and maybe a little clumsiness), but the end result was this light, fluffy, and beautifully layered treat that everyone kept going back for. You know that feeling when a simple, no-fuss recipe turns into something that actually impresses? Yeah, that.
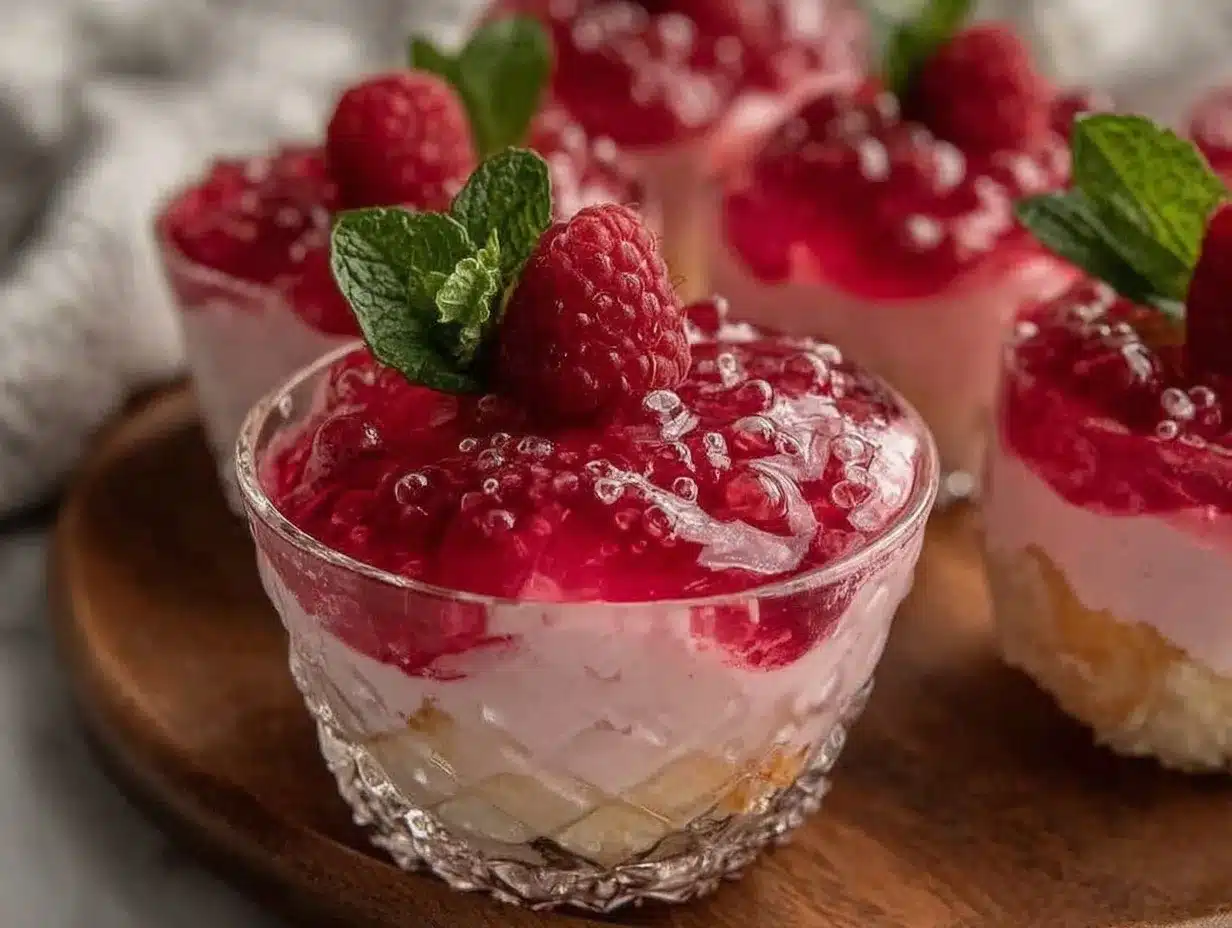
Maybe you’ve been there—scrambling to whip up something sweet without hours to spare. These mousse cups became my secret weapon, combining the nostalgic charm of pink gelatin with a creamy mousse texture that you can make in no time. Let me tell you, the way the pink layers peek through, contrasted with the smooth white mousse, it’s just too cute to resist. This recipe stuck with me because it’s party-perfect, fuss-free, and honestly, kind of addictive once you try it.
Why You’ll Love This Recipe
- Quick & Easy: Comes together in under 30 minutes, making it perfect for those last-minute party plans or sudden dessert cravings.
- Simple Ingredients: Uses pantry staples like gelatin, cream, and sugar — no fancy shopping trips required.
- Perfect for Parties: These layered mousse cups look elegant and festive, ideal for potlucks, birthdays, and casual get-togethers.
- Crowd-Pleaser: Kids and adults alike adore the sweet pink layers paired with creamy mousse — it’s a guaranteed hit.
- Unbelievably Delicious: The texture is light and fluffy, with a delicate balance of sweetness that doesn’t overwhelm.
What makes this recipe stand out is the “pink gelatin trick” — a simple method that transforms ordinary gelatin into a fluffy mousse layer, giving these cups a dreamy texture that feels a little fancy but is super easy to pull off. Unlike other gelatin desserts that can be rubbery or overly sweet, this one has a soft, melt-in-your-mouth quality you’ll want to make again and again.
Honestly, it’s the kind of dessert where you can close your eyes after the first spoonful and just savor the moment. Whether you’re impressing guests or treating yourself, these mousse cups deliver that cozy, joyful vibe without the hassle.
What Ingredients You Will Need
This recipe uses simple, wholesome ingredients to deliver bold flavor and a satisfying texture without the fuss. Most items are pantry staples, so you might already have everything on hand. Here’s what you’ll gather:
- Pink Gelatin Powder (1 package, about 3 ounces) – I like using brands like Knox or Jell-O for consistent color and flavor.
- Cold Water (1 cup / 240 ml) – For dissolving the gelatin.
- Heavy Whipping Cream (1 ½ cups / 360 ml) – Chilled, to whip into that luscious mousse texture.
- Granulated Sugar (¼ cup / 50 grams) – Adjust to taste, but I find this balances well with the gelatin’s sweetness.
- Vanilla Extract (1 teaspoon) – Adds a subtle warm note to the mousse.
- Optional: Fresh Strawberries or Raspberries (for garnish) – Adds a fresh pop of flavor and color.
Some quick tips: using cold water to dissolve the gelatin helps it set properly without lumps. I usually chill the whipping cream beforehand to make whipping easier and fluffier. If you want a dairy-free option, coconut cream works nicely but changes the flavor a bit. Also, for a little twist, swapping the pink gelatin for other flavors (like cherry or raspberry) works great, especially in summer when fresh berries are in season.
Equipment Needed
- Mixing Bowls: At least two, one for dissolving gelatin and one for whipping cream.
- Electric Mixer or Whisk: An electric hand mixer is ideal for whipping the cream to soft peaks, but a sturdy whisk works if you’re up for the arm workout.
- Measuring Cups and Spoons: For precise measurements of liquids and sugar.
- Serving Cups or Dessert Glasses: Small clear cups (4-6 ounces / 120-180 ml) showcase the pretty layers beautifully.
- Spoon or Small Spatula: For folding and layering the mousse gently.
If you don’t have an electric mixer, don’t worry; whipping cream by hand takes a bit longer but you’ll get there. For budget-friendly options, basic glassware works just as well as fancy dessert dishes — it’s all about the layers! Also, keeping your bowls and beaters cold before whipping helps speed things along.
Preparation Method
- Dissolve the Gelatin: Pour 1 cup (240 ml) of cold water into a mixing bowl and sprinkle the entire package of pink gelatin powder over the surface. Let it bloom (absorb water) for 5 minutes. After blooming, gently warm the gelatin mixture over a double boiler or microwave in short bursts (10-15 seconds), stirring until completely dissolved. Be careful not to overheat or boil, or the gelatin will lose its setting power. This step takes about 10 minutes.
- Whip the Cream: In a separate chilled bowl, pour 1 ½ cups (360 ml) of heavy whipping cream and add ¼ cup (50 grams) granulated sugar along with 1 teaspoon vanilla extract. Using an electric mixer or whisk, beat until soft peaks form. The cream should be fluffy but not too stiff. This usually takes 3-5 minutes with a mixer.
- Combine Gelatin and Cream: Slowly pour the warm gelatin mixture into the whipped cream while gently folding with a spatula. Take your time—fold carefully to maintain the airy texture. If you pour too fast or stir vigorously, the mousse will deflate, and you lose that lightness. This folding step should take about 3 minutes.
- Layer the Mousse Cups: Spoon a few tablespoons of the pink gelatin mousse into your serving cups, filling about one-third of each cup. Place the cups in the refrigerator for about 15 minutes to let the first layer set slightly.
- Repeat Layers: Once the first layer is slightly firm, add another layer of mousse. You can alternate with a plain whipped cream layer if you want contrast, or just repeat the pink mousse for a uniform look. Chill again for 15-20 minutes.
- Final Chill and Garnish: After layering, refrigerate the mousse cups for at least 1 hour to fully set. Before serving, garnish with fresh berries or a sprig of mint if you like. The mousse should hold its shape but still be soft and creamy. This final chill takes the longest but is key for the perfect texture.
Pro tip: If your gelatin sets too quickly while folding, work a little faster or warm the gelatin slightly again. Also, don’t rush the chilling steps—patience here really pays off in texture. I made the mistake once of skipping the resting time, and honestly, it was a bit runny and disappointing.
Cooking Tips & Techniques
Here’s the scoop from my kitchen trials: whipping cream to the right consistency is everything. Too soft, and the mousse won’t hold; too stiff, and it can become grainy. Watch it closely as it whips—soft peaks mean the cream holds shape but still folds easily.
When mixing gelatin with cream, folding gently is key. You want to keep as much air as possible trapped inside. Think of it like folding egg whites into batter—vigorous stirring will flatten your mousse.
Another tip: bloom your gelatin properly. Let it sit undisturbed for a few minutes in cold water before warming. Skipping this makes lumps, and no one wants that in their mousse cups.
Timing-wise, plan ahead. It’s tempting to rush the chilling process, but at least an hour in the fridge makes all the difference in texture and appearance. I usually prep these cups in the morning for an evening party so they’re perfectly set.
And a little heads-up: gelatin desserts aren’t freezer-friendly. If you freeze these mousse cups, they’ll lose their texture, so stick to refrigeration.
Variations & Adaptations
- Flavor Variations: Swap the pink gelatin for lime or lemon flavors to create different color combos and taste profiles.
- Dairy-Free Option: Use coconut cream whipped with a bit of powdered sugar instead of heavy cream for a tropical twist.
- Layer Mix-Up: Alternate layers of crushed cookies (like graham crackers or shortbread) with the mousse for a crunchy surprise.
- Low-Sugar Version: Use sugar-free gelatin and replace granulated sugar with a natural sweetener like stevia or erythritol.
- Personal Favorite: I once added a thin layer of strawberry jam between mousse layers for extra fruitiness—totally worth it!
Serving & Storage Suggestions
Serve these mousse cups chilled straight from the refrigerator. Their creamy texture and pretty pink layers look irresistible in clear glasses or small mason jars. For a party touch, garnish with fresh berries, edible flowers, or a sprinkle of toasted coconut.
Pair them with light, refreshing drinks like sparkling water with a splash of citrus or a cold white wine to balance the sweetness. They also work great alongside other crowd-pleasers like crispy garlic chicken for a full meal.
Store mousse cups covered in the fridge for up to 3 days. The flavors actually mellow and become more harmonious overnight, so if you can, make them a day ahead. Avoid freezing as it breaks down the gelatin’s delicate texture—trust me, I learned that the hard way!
When reheating (if needed for room temp preference), just let them sit out for 15 minutes before serving; don’t microwave or warm directly, or you’ll lose the mousse structure.
Nutritional Information & Benefits
Each serving of these Easy Pink Gelatin Trick Layered Mousse Cups contains approximately 180 calories, with 12 grams of fat (mostly from the whipping cream) and around 15 grams of sugar. They’re a moderate treat, perfect for special occasions.
Gelatin itself supports joint health and digestion, while the heavy cream provides a good source of fat-soluble vitamins like A and D. For those watching carbs, swapping sugar for a sweetener or reducing the sugar amount helps keep it lighter.
This dessert is gluten-free by nature, making it accessible to many dietary needs. Just watch out if you add cookies or other mix-ins. From a wellness perspective, it’s a fun way to enjoy a sweet treat without overcomplicating ingredients or prep.
Conclusion
These Easy Pink Gelatin Trick Layered Mousse Cups are proof that a simple pantry staple can become a party showstopper with a little creativity and patience. Whether you’re short on time or just want a fuss-free dessert that looks fancy, this recipe has your back.
Try swapping flavors, adding your favorite garnishes, or layering in textures to make it uniquely yours. I keep coming back to this recipe because it’s reliable, delicious, and always brings smiles around the table.
Give it a go, and when you do, I’d love to hear how your mousse cups turned out or what fun twists you added. Share your stories and spread the joy of easy, beautiful desserts!
FAQs
Can I use flavored gelatin other than pink?
Absolutely! You can use any flavored gelatin you like. Just keep in mind the color and flavor will change accordingly.
What if I don’t have heavy cream?
You can try whipping coconut cream as a dairy-free alternative, but the texture and flavor will differ slightly.
How long can I store these mousse cups?
Store them in the refrigerator for up to 3 days. They taste best chilled and fresh.
Can I make this recipe ahead of time?
Yes! In fact, making them a day ahead helps the flavors meld and the layers set perfectly.
Is there a way to make this dessert less sweet?
Reduce the sugar amount or use a sugar substitute to suit your taste preferences without compromising texture much.
Pin This Recipe!
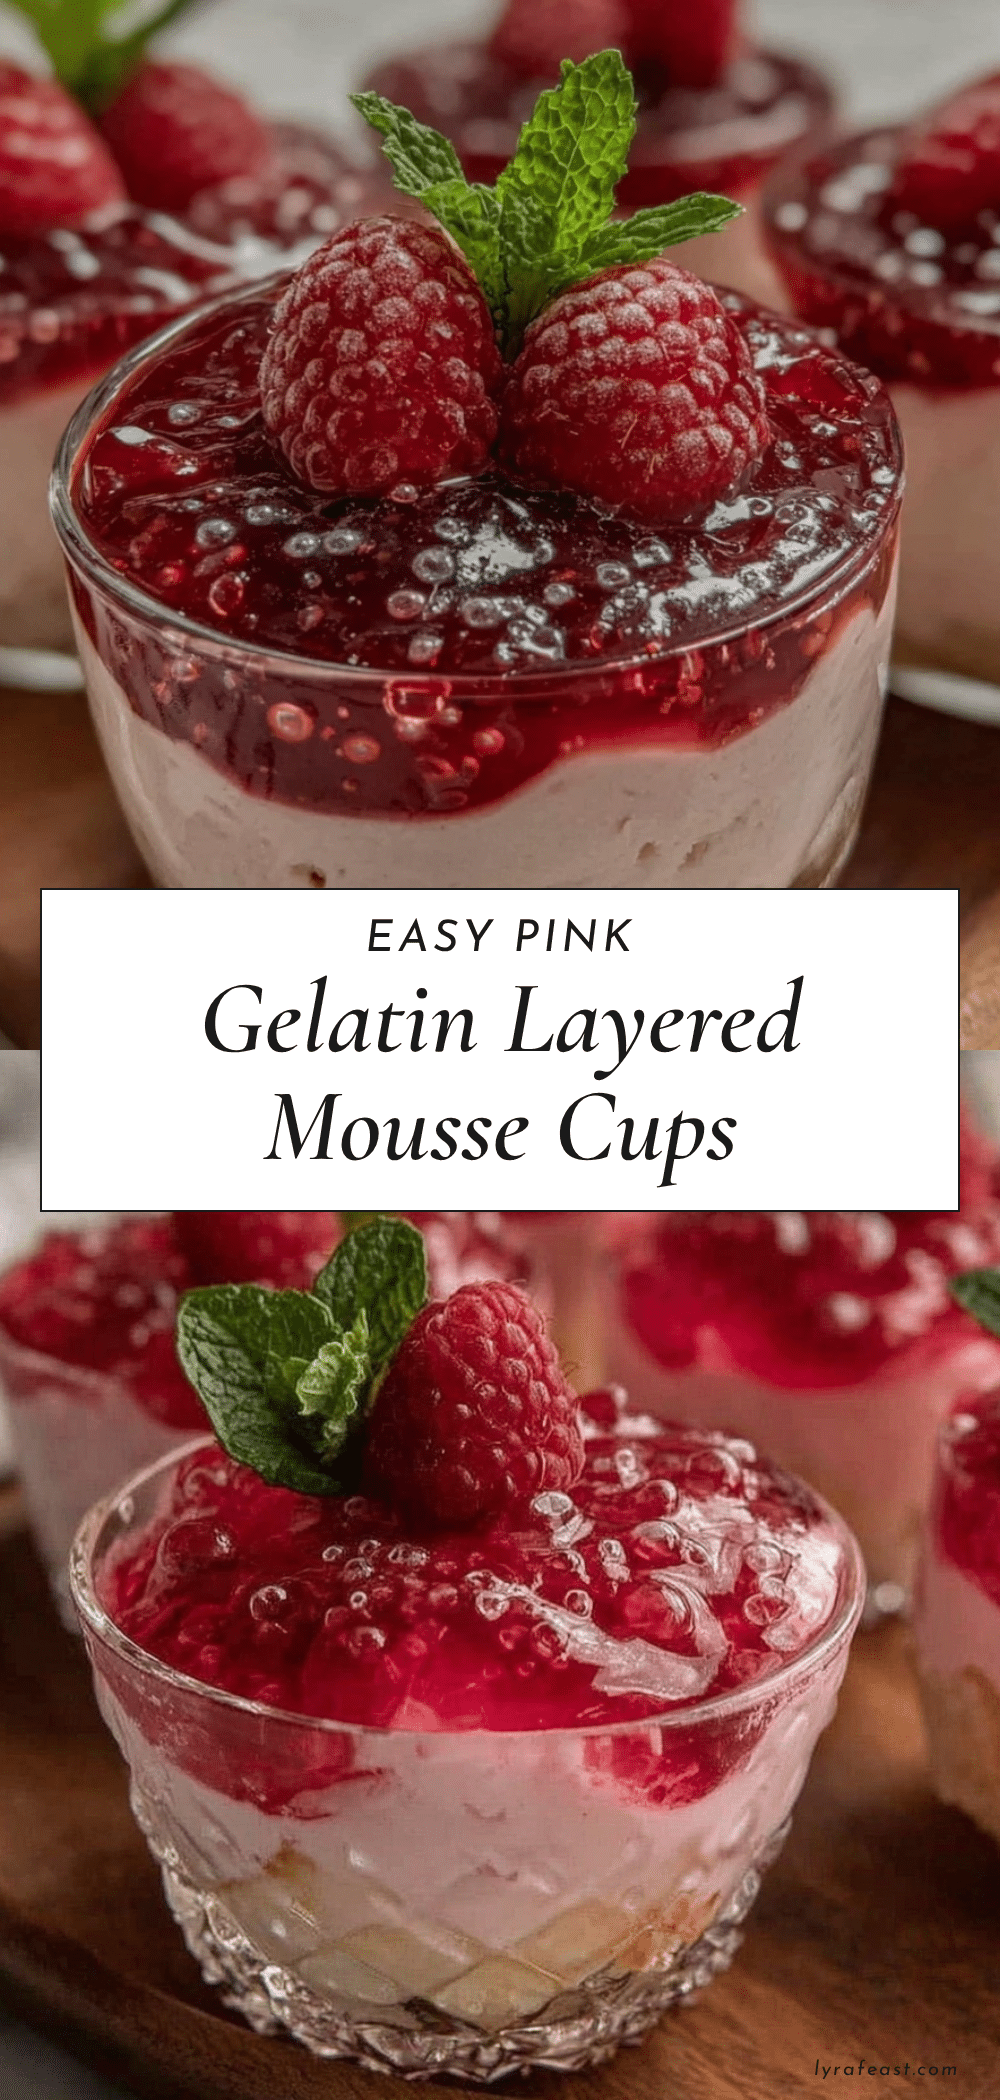
Easy Pink Gelatin Trick Layered Mousse Cups Recipe for Perfect Party Desserts
A quick and easy layered mousse dessert using pink gelatin and whipped cream, perfect for parties and last-minute gatherings. Light, fluffy, and beautifully layered with a creamy texture and sweet pink gelatin layers.
- Prep Time: 10 minutes
- Cook Time: 20 minutes
- Total Time: 1 hour 30 minutes
- Yield: 6 servings 1x
- Category: Dessert
- Cuisine: American
Ingredients
- 1 package (about 3 ounces) pink gelatin powder (e.g., Knox or Jell-O)
- 1 cup (240 ml) cold water
- 1 ½ cups (360 ml) heavy whipping cream, chilled
- ¼ cup (50 grams) granulated sugar
- 1 teaspoon vanilla extract
- Optional: fresh strawberries or raspberries for garnish
Instructions
- Pour 1 cup (240 ml) of cold water into a mixing bowl and sprinkle the entire package of pink gelatin powder over the surface. Let it bloom for 5 minutes.
- Gently warm the gelatin mixture over a double boiler or microwave in short bursts (10-15 seconds), stirring until completely dissolved. Avoid overheating or boiling.
- In a separate chilled bowl, pour 1 ½ cups (360 ml) of heavy whipping cream, add ¼ cup (50 grams) granulated sugar and 1 teaspoon vanilla extract. Beat with an electric mixer or whisk until soft peaks form (3-5 minutes).
- Slowly pour the warm gelatin mixture into the whipped cream while gently folding with a spatula to maintain airy texture.
- Spoon a few tablespoons of the pink gelatin mousse into serving cups, filling about one-third of each cup. Refrigerate for about 15 minutes to let the first layer set slightly.
- Add another layer of mousse or alternate with plain whipped cream. Chill again for 15-20 minutes.
- Refrigerate the mousse cups for at least 1 hour to fully set.
- Before serving, garnish with fresh berries or a sprig of mint if desired.
Notes
Use cold water to dissolve gelatin to avoid lumps. Chill whipping cream beforehand for easier whipping. Fold gelatin into cream gently to keep mousse airy. Chill mousse cups for at least 1 hour for best texture. Avoid freezing as it breaks down gelatin texture. For dairy-free option, use whipped coconut cream. Flavor variations include lime or lemon gelatin. Can add layers of crushed cookies or strawberry jam for texture and flavor.
Nutrition
- Serving Size: 1 mousse cup (about
- Calories: 180
- Sugar: 15
- Fat: 12
- Carbohydrates: 15
Keywords: pink gelatin, mousse cups, party dessert, layered mousse, easy dessert, quick dessert, gelatin mousse, whipped cream dessert