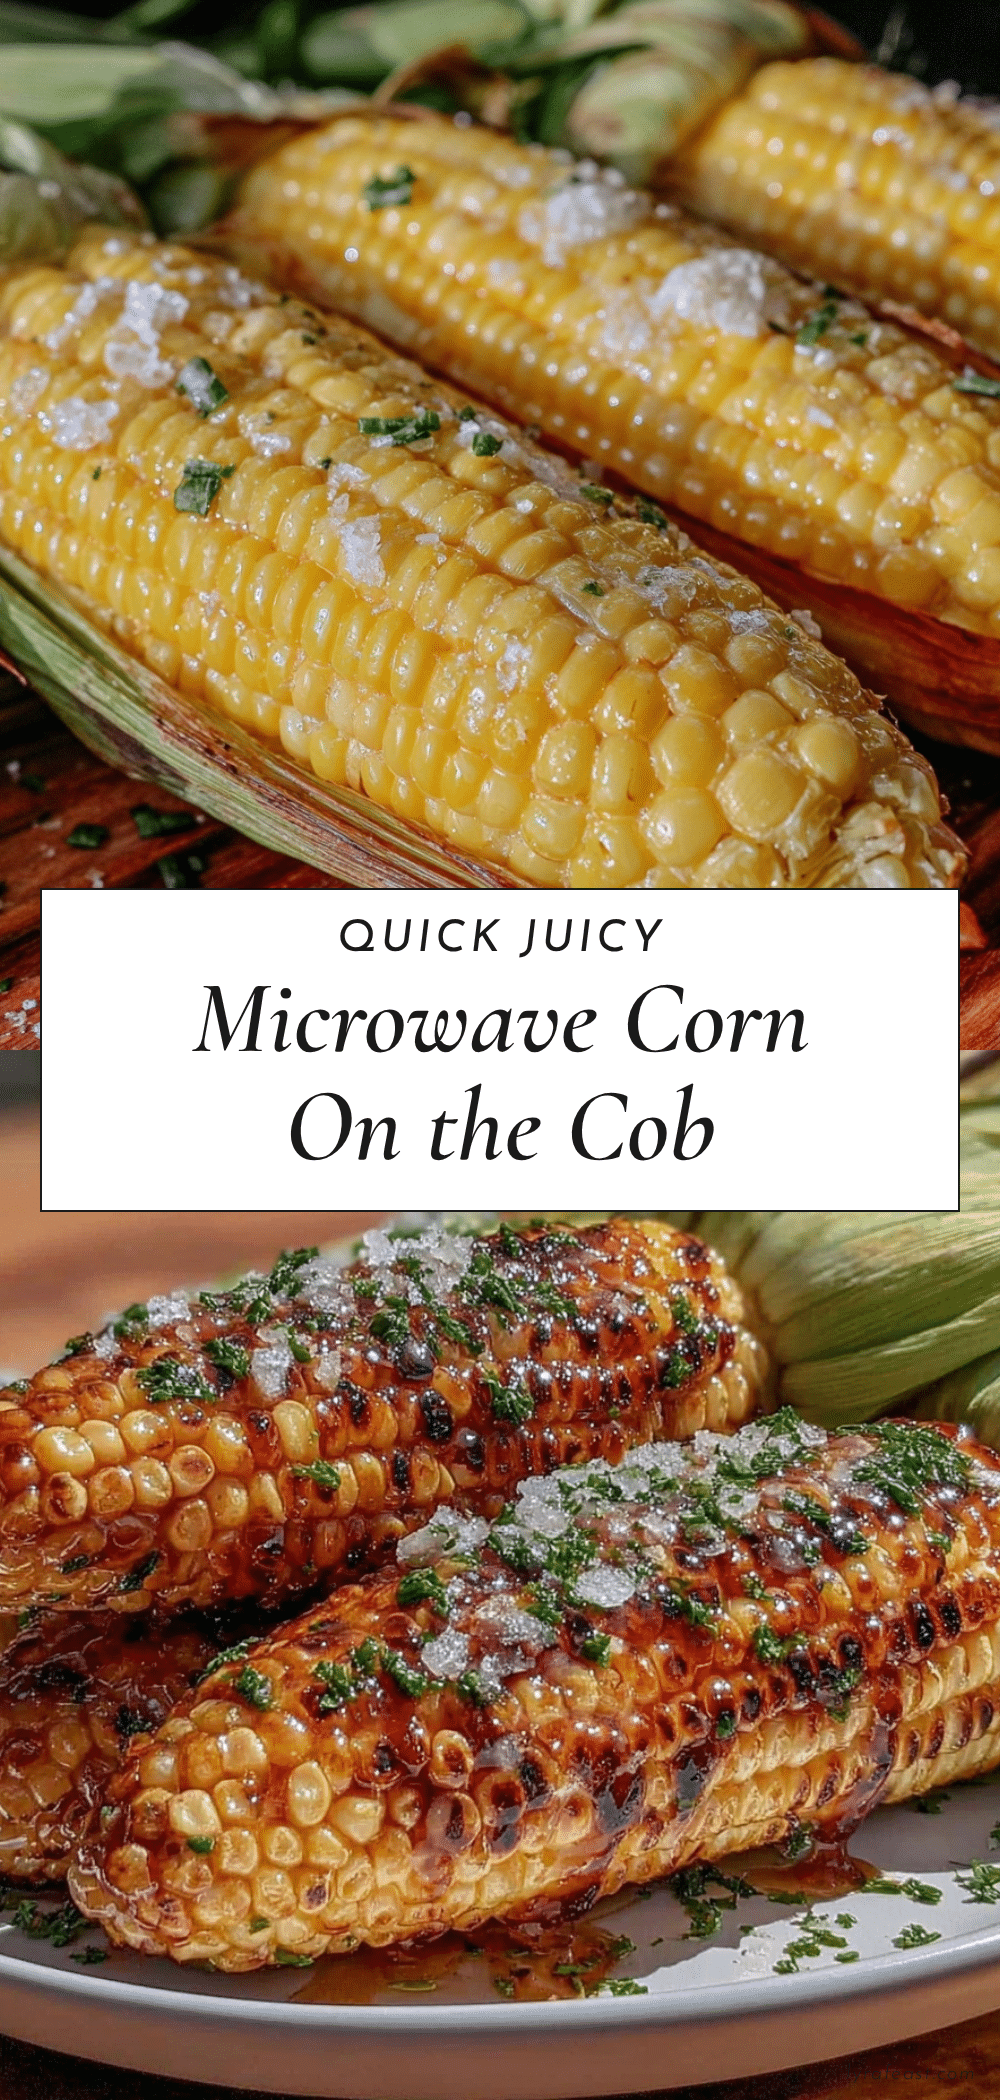
“It was one of those blazing hot July afternoons, and honestly, the last thing I wanted was to fire up the grill or dirty a pot,” I remember telling my roommate, Lisa. We were craving corn on the cob, that sweet, juicy goodness that screams summer, but without the usual mess and fuss. She shrugged and said, “Why don’t you just zap it in the microwave?” I gave her a skeptical look — microwaved corn? Really? But hey, I was game for a quick fix.
So there I was, juggling a cracked ceramic bowl (don’t ask how that happened), half a stick of butter, and a kitchen timer that I barely trusted. What happened next was a revelation: perfect, juicy corn on the cob, steamed to tender sweetness in under five minutes. No pots boiling over, no husks flying across the kitchen floor, just pure corn bliss. You know that feeling when you discover a simple trick that changes your entire routine? That was it for me.
This Quick Juicy Microwave Corn on the Cob No Mess Method has stuck with me ever since, especially on those busy weeknights when I want a side that’s both fast and ridiculously satisfying. Maybe you’ve been there, craving that fresh corn flavor without the typical hassle. Well, let me tell you — this method is a game changer.
Why You’ll Love This Recipe
I’ve tried countless ways to cook corn on the cob, from boiling to grilling, but this microwave method truly hits the sweet spot. Here’s why it keeps me coming back:
- Quick & Easy: Ready in just 4-5 minutes, it’s perfect for those last-minute cravings or when you’re juggling a million things in the kitchen.
- Minimal Cleanup: No pots, no steaming baskets, just a microwave-safe bowl and a plate. Honestly, it’s almost too easy.
- Juicy & Tender: The corn steams in its own natural moisture inside the microwave, locking in sweetness and preventing dryness.
- Great for Any Occasion: Whether you’re throwing together a quick weeknight dinner or need a fast side for a casual barbecue, this method fits the bill.
- Simple Ingredients: You only need fresh corn, water, and a touch of butter or seasoning if you like, making it hassle-free and budget-friendly.
This recipe isn’t just another way to cook corn; it’s a no-nonsense, no-mess approach that respects the natural flavor and texture. Plus, it’s been tested over and over in my tiny apartment kitchen (where space and time are precious), and it never fails. I mean, who doesn’t want juicy corn without the fuss of husking, boiling water, or dirtying pans?
What Ingredients You Will Need
This Quick Juicy Microwave Corn on the Cob recipe keeps things straightforward with ingredients you probably already have on hand. Each component plays a simple role to bring out the best in your corn.
- Fresh Corn on the Cob: 1-4 ears, husked and silk removed. Look for firm kernels that pop slightly when pressed. If it’s summer, local farm stands usually have the sweetest picks.
- Water: About 2 tablespoons (30 ml) per ear of corn. This small amount creates the steam environment inside the bowl.
- Unsalted Butter: 1 tablespoon (optional, per ear). Adds richness and helps the seasoning stick. I usually grab Land O Lakes for its creamy flavor.
- Salt and Pepper: To taste. Simple but essential for highlighting the corn’s natural sweetness.
- Optional Extras: A squeeze of fresh lime juice, a sprinkle of smoked paprika, or even a dash of chili powder if you want a little kick.
Substitution Tips:
- If you want a dairy-free option, swap the butter for olive oil or a vegan butter alternative like Earth Balance.
- You can use frozen corn on the cob in a pinch, but fresh will always yield juicier results.
- For a low-sodium version, skip the added salt and experiment with fresh herbs like chopped cilantro or parsley after cooking.
Equipment Needed
- Microwave-Safe Bowl: A medium to large-sized ceramic or glass bowl with a lid or microwave-safe plate to cover. I prefer Pyrex because it’s sturdy and easy to clean.
- Microwave Oven: Any standard microwave with a wattage between 700-1200 watts will work just fine.
- Tongs or Oven Mitts: For safely removing the hot bowl from the microwave. The bowl can get steamy!
- Butter Knife or Spoon: To spread butter or season your corn after cooking.
Alternative Options:
- If you don’t have a bowl with a lid, use a microwave-safe plate to cover the corn and trap steam.
- For budget-friendly options, simple glass mixing bowls from your local store work well, just check they’re labeled microwave-safe.
- Keep your tools clean and dry to prevent any slipping accidents when handling hot dishes.
Preparation Method
- Prepare the Corn: Husk the corn completely, removing all silks. Don’t stress if a few strands remain; they’ll steam off. Rinse the ears under cold water and pat dry with a towel. (Prep time: 3-5 minutes)
- Place Corn in Bowl: Lay 1-4 ears of corn in your microwave-safe bowl. Make sure they fit comfortably without crowding.
- Add Water: Pour about 2 tablespoons (30 ml) of water per ear over the corn. This creates the steam needed to cook the corn evenly and keep it juicy.
- Cover the Bowl: Use a microwave-safe lid or plate to cover tightly. This traps steam and cooks the corn quickly.
- Microwave on High: Cook for 4 minutes if using 1-2 ears, or 5-6 minutes for 3-4 ears. (Microwave wattages vary, so start with 4 minutes and add time if needed.) You’ll notice steam escaping from under the lid—that’s a good sign!
- Check for Doneness: Carefully remove the bowl with tongs or oven mitts (it will be hot!). The corn should be bright yellow and tender when pierced with a fork. If it’s still a bit firm, cover and microwave for an additional 30 seconds at a time.
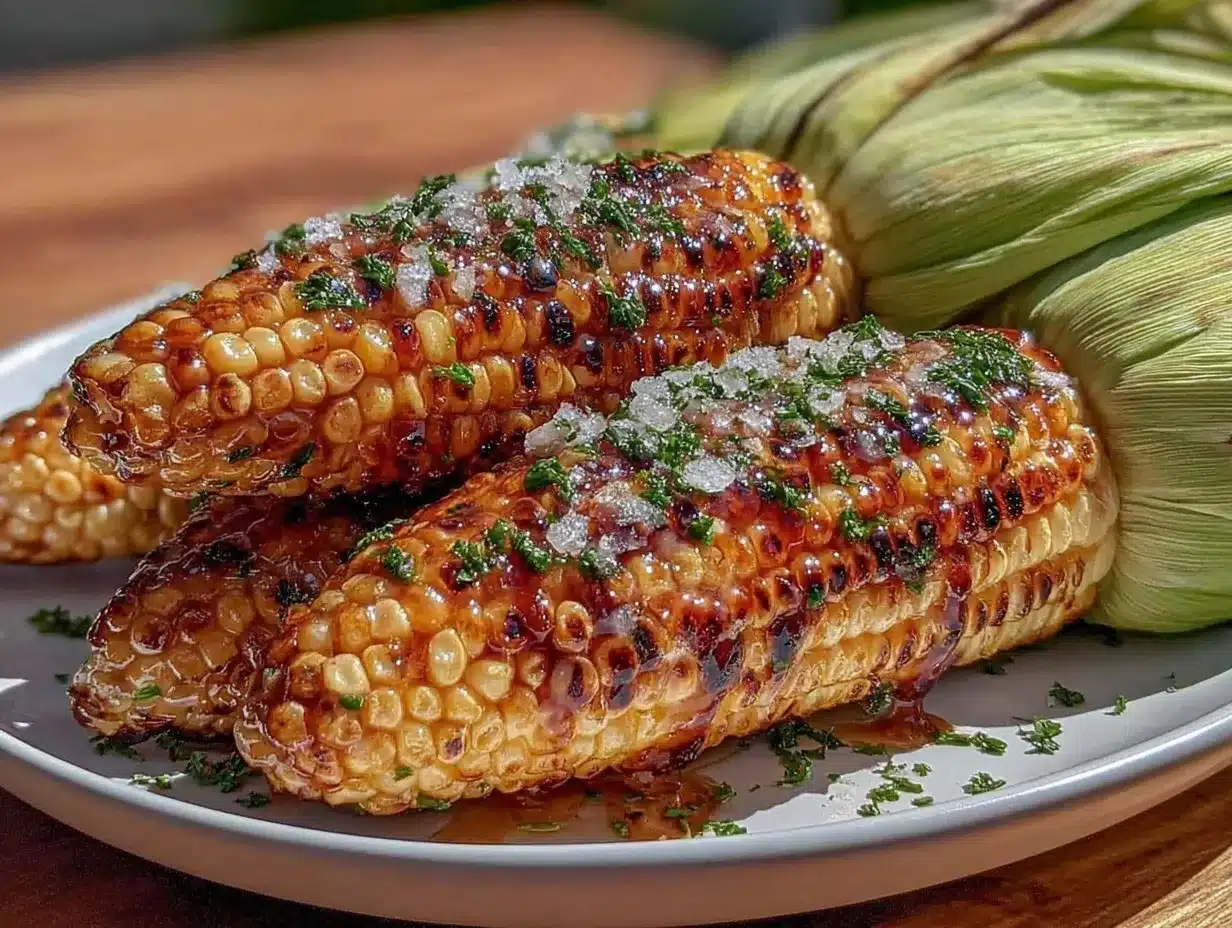
- Season and Serve: Spread butter over the hot corn, sprinkle salt and pepper, or add your favorite seasonings. For a little twist, try a squeeze of lime or a dash of smoked paprika.
Pro Tip: Letting the corn rest covered for a minute after microwaving helps even out the heat and juices.
Sometimes, I forget to cover the bowl properly (oops), and the corn ends up a bit drier. That’s a quick learning curve—don’t skip the cover! You’ll get perfectly juicy corn every time if you keep that in mind.
Cooking Tips & Techniques
Here’s what I’ve picked up over countless microwaved corns on the cob:
- Don’t Skip the Water: Even a small splash makes all the difference for steam cooking. Without moisture, the corn can dry out quickly.
- Use Fresh Corn: Freshness affects sweetness and texture. Older corn can be tougher and less juicy.
- Cover Tightly: Whether with a lid or microwave-safe plate, trapping steam is key to tender kernels.
- Adjust Time Based on Quantity: More ears need slightly longer cooking. If you’re unsure, cook less first and add bursts of 30 seconds until done.
- Season After Cooking: Butter and salt stick better to hot corn. Adding seasoning beforehand can dilute flavors or make the corn soggy.
One time, I tried to rush things and skipped the cover. The result? Dry, chewy kernels that I barely finished. Lesson learned! Also, using a microwave-safe silicone lid can make the process even simpler and less messy.
Variations & Adaptations
This method is flexible and invites creativity. Here are some ways to make your microwave corn uniquely yours:
- Herb Butter Corn: Mix softened butter with fresh herbs like parsley, chives, or dill. Spread over the hot corn for a fragrant twist.
- Spicy Kick: Sprinkle chili powder, cayenne, or smoked paprika after buttering for a smoky heat that pairs perfectly with the sweetness.
- Cheesy Treat: Add grated Parmesan or Cotija cheese on top right after buttering for a savory, melty finish.
- Vegan Version: Use olive oil or a plant-based butter alternative and add a pinch of nutritional yeast for cheesy flavor.
- Microwave ‘Elote’ Style: Slather with mayo, sprinkle with chili powder and cotija cheese, then finish with a squeeze of lime for a Mexican street corn feel.
For a personal twist, I tried adding a little maple syrup to the butter once—surprisingly delicious, especially with a sprinkle of cinnamon! And if you want to switch it up, grilled corn on the cob with a crispy garlic chicken makes a perfect summer combo.
Serving & Storage Suggestions
Serve this Quick Juicy Microwave Corn on the Cob straight from the bowl, while it’s still steaming hot. The warmth really helps the butter melt into every kernel. For a casual meal, pair it with grilled meats or a fresh salad. Personally, I love serving it alongside a tangy coleslaw or creamy potato salad.
If you have leftovers, wrap each ear tightly in plastic wrap or place in an airtight container and refrigerate for up to 2 days. To reheat, pop the corn back in the microwave for about 1-2 minutes covered, or warm it gently on the stove wrapped in foil.
Interestingly, the flavors deepen a bit after resting, so if you have time, letting the corn sit covered for 10 minutes can make it even tastier. Just don’t let it get cold — corn loses its charm when chilled.
Nutritional Information & Benefits
This simple corn on the cob recipe is naturally gluten-free and low in fat (unless you pile on the butter, but hey, that’s the fun part). Corn is a good source of fiber, vitamin C, and essential antioxidants. Plus, it’s a whole grain that can support digestion and heart health.
Using minimal ingredients keeps it light, making it a smart choice for a side dish that won’t weigh you down. If you’re watching sodium intake, you can skip the added salt or use a salt substitute.
From a wellness perspective, I appreciate how this recipe lets the corn’s natural sweetness shine without drowning it in heavy sauces or oils. It’s a reminder that sometimes, simple is best.
Conclusion
This Quick Juicy Microwave Corn on the Cob No Mess Method has become a staple in my kitchen for good reason. It’s fast, fuss-free, and delivers that tender, sweet corn experience without the usual cleanup hassle. I encourage you to try it out and make it your own—add your favorite seasonings or keep it classic with butter and salt.
I love this recipe because it proves that great food doesn’t have to be complicated or time-consuming. Give it a go, and let me know what you think! Feel free to share your twists or questions in the comments—I’m always curious to hear how others make this simple method their own.
So next time you’re craving corn on the cob but short on time or patience, remember this easy trick. You might just find yourself making it again and again.
FAQs
Can I microwave corn on the cob without removing the husk?
Yes, you can microwave corn with the husk on, but it takes longer and can be messier when removing the husk afterward. Removing the husk and silk beforehand gives more even cooking and a cleaner experience.
How do I know when the corn is done?
The kernels should be bright yellow, plump, and tender when pierced with a fork. If they feel firm or dry, microwave in 30-second increments until fully cooked.
Can I cook multiple ears of corn at once?
Absolutely! Just make sure your bowl is large enough and increase the microwave time by 1-2 minutes depending on how many ears you cook.
Is this method suitable for all microwave wattages?
Most microwaves between 700-1200 watts work well. If you have a lower wattage microwave, you may need to increase cooking time slightly.
What are some good seasoning ideas beyond butter and salt?
Try lime juice with chili powder, herb butter with parsley or chives, grated Parmesan, or a sprinkle of smoked paprika for different flavor profiles.
Pin This Recipe!
Quick Juicy Microwave Corn on the Cob Recipe No Mess Easy Method

A fast and easy microwave method to cook juicy, tender corn on the cob without the mess of boiling or grilling. Perfect for busy days and minimal cleanup.
- Prep Time: 5 minutes
- Cook Time: 5 minutes
- Total Time: 10 minutes
- Yield: 1-4 servings 1x
- Category: Side Dish
- Cuisine: American
Ingredients
- 1–4 ears fresh corn on the cob, husked and silk removed
- 2 tablespoons water per ear of corn
- 1 tablespoon unsalted butter per ear (optional)
- Salt and pepper to taste
- Optional extras: fresh lime juice, smoked paprika, chili powder
Instructions
- Husk the corn completely, removing all silks. Rinse under cold water and pat dry.
- Place 1-4 ears of corn in a microwave-safe bowl, ensuring they fit comfortably.
- Pour about 2 tablespoons (30 ml) of water per ear over the corn.
- Cover the bowl tightly with a microwave-safe lid or plate to trap steam.
- Microwave on high for 4 minutes if cooking 1-2 ears, or 5-6 minutes for 3-4 ears. Adjust time as needed based on microwave wattage.
- Carefully remove the bowl using tongs or oven mitts. Check if the corn is tender by piercing with a fork; if not, microwave in 30-second increments until done.
- Spread butter over the hot corn and season with salt, pepper, or your favorite seasonings.
- Let the corn rest covered for 1 minute to even out heat and juices before serving.
Notes
Do not skip adding water and covering the bowl tightly to ensure the corn steams properly and stays juicy. Adjust microwave time based on the number of ears and your microwave wattage. Letting the corn rest covered after cooking helps distribute heat and juices evenly.
Nutrition
- Serving Size: 1 ear of corn
- Calories: 110
- Sugar: 6
- Sodium: 150
- Fat: 7
- Saturated Fat: 4
- Carbohydrates: 14
- Fiber: 2
- Protein: 3
Keywords: microwave corn on the cob, quick corn recipe, easy corn side dish, no mess corn, juicy corn on the cob