I was standing in the school pickup line last Tuesday when the smell hit me — that unmistakable, slightly sweet aroma of broccoli cooking, mixed with something cheesy and warm. It came from a tiny thermos someone had just opened, and before I could stop myself, I was ten years old again, sitting at my aunt Carol’s kitchen table. She wasn’t actually my aunt — she was my mom’s best friend from college — but she had this way of making everyone feel like family. Her kitchen always smelled like that: broccoli and cheddar, bubbling away on the stove. I remember the cracked yellow bowl she used to mix everything in, the way she’d let me press the rice mixture into muffin tins with my bare hands, even though it was way too hot. I burned my fingertips every single time. Honestly, I think that was part of the ritual.
I haven’t seen Aunt Carol in years — she moved to Arizona after her husband retired — but that smell in the pickup line brought her right back to me. Maybe you’ve been there, you know? That feeling when a random scent just yanks you back in time, before you even have time to prepare yourself. I stood there for a second, probably looking completely ridiculous, just breathing in and trying to hold onto the memory. Then I got in my car, drove straight to the grocery store, and bought broccoli, cheddar, and rice. I was determined to recreate those little cups of comfort that had somehow become a core memory of my childhood.
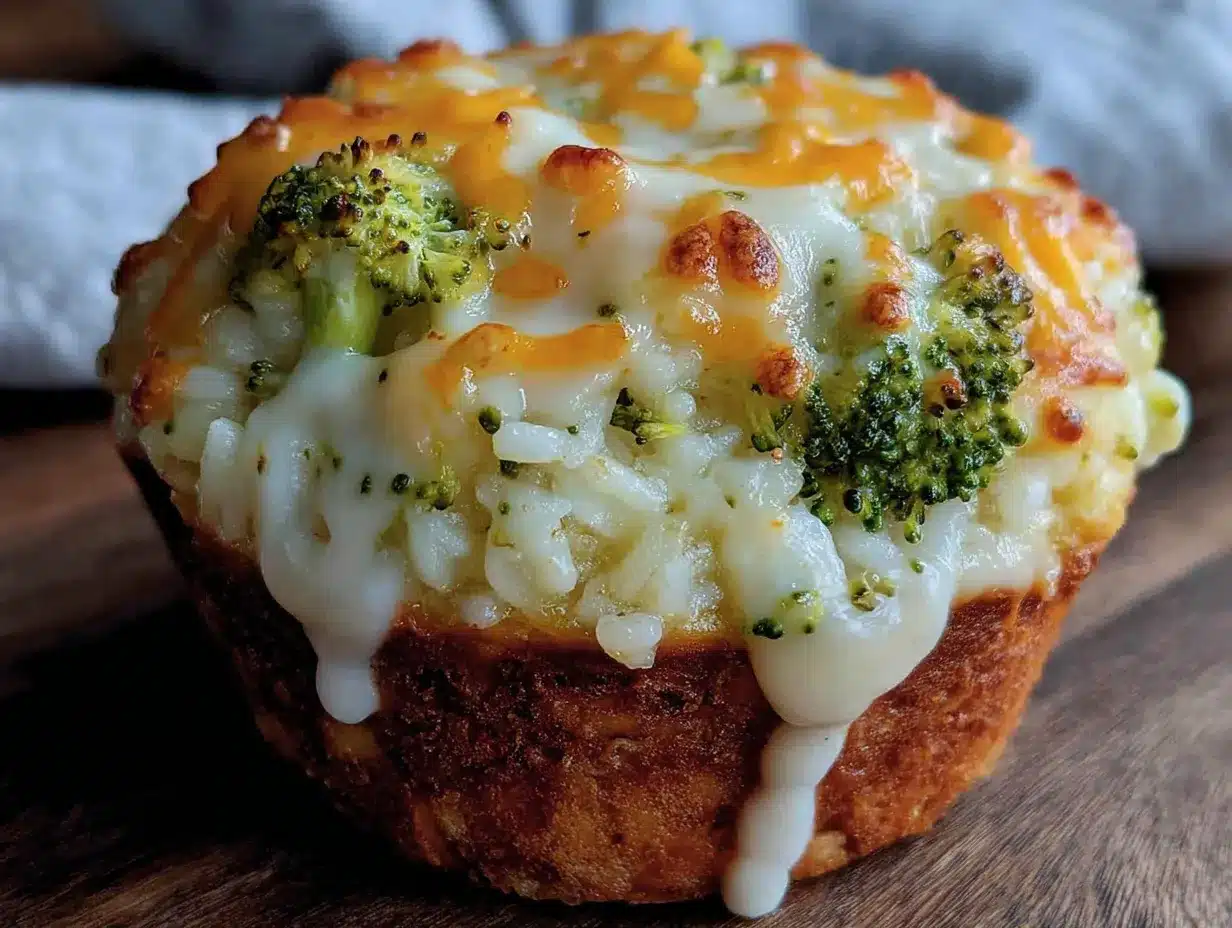
These Easy Cheesy Broccoli Rice Cups for Thermos Lunches are my attempt to capture that exact feeling — the warmth, the cheesiness, the way the edges get just a little bit crispy while the middle stays soft and tender. They’re perfect for packing in a thermos, which means your kids (or honestly, you) can enjoy that same warm, comforting lunch hours later. I’ve tweaked Aunt Carol’s original recipe to make it simpler and more reliable, because let’s face it — I don’t have her patience for burned fingertips anymore. These cups come together fast, they freeze beautifully, and they solve that eternal lunch-packing dilemma: something warm, filling, and actually good for you. This is the recipe that stayed with me, and now I’m sharing it with you.
Why You’ll Love This Recipe
Let me tell you why these Easy Cheesy Broccoli Rice Cups for Thermos Lunches have become a staple in my kitchen. I’ve tested this recipe at least a dozen times — probably more — tweaking the ratios, trying different cheeses, and figuring out the exact baking time that gives you those perfectly golden edges without drying out the center. These little cups are the real deal.
- Quick & Easy: Comes together in under 40 minutes, with only about 15 minutes of active prep time. Perfect for those Sunday meal prep sessions or even a weekday morning if you’re organized.
- Simple Ingredients: No fancy grocery trips needed. Rice, broccoli, cheese, eggs, and a few pantry staples — that’s it. You likely already have everything in your kitchen right now.
- Perfect for School Lunches: These cups are designed specifically for thermos lunches. They hold their shape, they reheat beautifully, and kids actually eat them without complaint. That’s a win in my book.
- Crowd-Pleaser: I’ve served these at playdates, potlucks, and even a grown-up brunch. Kids and adults alike go back for seconds. There’s something about the combination of cheese and broccoli in a cute, portable form that everyone loves.
- Unbelievably Delicious: The texture is what gets me every time. The edges get slightly crispy and golden, while the inside stays soft, cheesy, and almost custard-like. It’s comfort food in a muffin tin.
What makes this recipe different from all the other broccoli rice cups out there? It’s the ratio, honestly. I spent a lot of time figuring out the perfect balance of rice to cheese to egg, so these cups hold together beautifully without being dense or dry. They’re light, they’re flavorful, and they don’t fall apart when you reheat them. Plus, I’ve tested them specifically for thermos use — they stay warm for hours without getting soggy. That’s not something you can say about most baked goods.
This recipe isn’t just good — it’s the kind that makes you close your eyes after the first bite. It’s comfort food reimagined: healthier, faster, but with the same soul-soothing satisfaction. Perfect for impressing your kids’ lunch table without stress, or turning a simple dinner into something memorable. And honestly, it’s the kind of recipe that makes you feel like a good parent, even on days when you’re barely keeping it together.
What Ingredients You Will Need
This recipe uses simple, wholesome ingredients to deliver bold flavor and satisfying texture without the fuss. Most of these are pantry staples, which makes these Easy Cheesy Broccoli Rice Cups for Thermos Lunches perfect for last-minute meal prep.
For the Cups
- 2 cups cooked white rice (I prefer long-grain white rice for its fluffy texture; leftover rice works great here)
- 2 cups fresh broccoli florets, finely chopped (about one medium head of broccoli; you want them small enough to distribute evenly)
- 1 ½ cups shredded cheddar cheese (I recommend sharp cheddar for the best flavor — it cuts through the broccoli nicely)
- 3 large eggs, lightly beaten (room temperature works best for even mixing)
- ½ cup milk (whole milk gives the richest texture, but 2% works fine too)
- ¼ cup grated Parmesan cheese (adds a salty, nutty depth that complements the cheddar)
- 2 tablespoons unsalted butter, melted (for richness and to help with browning)
- ½ teaspoon garlic powder (don’t skip this — it makes everything better)
- ½ teaspoon onion powder
- ½ teaspoon salt (adjust to taste)
- ¼ teaspoon black pepper
- Pinch of red pepper flakes (optional, but I love the tiny bit of heat)
Ingredient Tips and Substitutions
For the rice, I’ve used both white and brown rice successfully. Brown rice adds more fiber and a nuttier flavor, but it does make the cups slightly denser. If you’re using brown rice, make sure it’s fully cooked and cooled before mixing — hot rice can scramble the eggs. I’ve also made these with quinoa for a higher-protein option, and honestly, they were still delicious. Just make sure your quinoa is well-drained.
Fresh broccoli is my preference here because it holds its texture better than frozen. However, if you only have frozen broccoli, thaw it completely and squeeze out as much moisture as possible with a clean kitchen towel. Too much water will make your cups soggy. I learned that the hard way — my first batch with undrained frozen broccoli turned into little green puddles. Not my finest moment.
For the cheese, sharp cheddar is non-negotiable in my kitchen. It has more flavor than mild cheddar, which means you can use less and still get that satisfying cheesy taste. If you want to mix it up, try half cheddar and half Monterey Jack for extra creaminess, or add a tablespoon of cream cheese for an ultra-rich texture. For a dairy-free version, use your favorite vegan cheddar shreds and unsweetened oat milk — just know the texture will be slightly different.
I recommend Tillamook or Cabot for sharp cheddar — they melt beautifully and have that perfect balance of creamy and sharp. For Parmesan, I use the good stuff from the refrigerated section, not the green can. It really does make a difference in flavor depth. But honestly, in a pinch, the green can works too. I’ve been there.
Equipment Needed
You don’t need anything fancy to make these Easy Cheesy Broccoli Rice Cups for Thermos Lunches. Here’s what you’ll need:
- 12-cup standard muffin tin (non-stick or well-seasoned works best)
- Large mixing bowl
- Medium saucepan (for cooking rice, if you’re not using leftovers)
- Chef’s knife and cutting board
- Box grater or food processor (for shredding cheese — pre-shredded cheese works but doesn’t melt as smoothly)
- Measuring cups and spoons
- Whisk
- Rubber spatula
- Cooling rack
If you don’t have a muffin tin, you can bake this mixture in an 8×8 inch baking dish — just increase the baking time by about 10 minutes and cut into squares after cooling. I’ve also used silicone muffin cups on a baking sheet, and they work beautifully. Just place them on a sturdy baking sheet so they’re easier to move in and out of the oven. A tip from experience: spray your muffin tin generously, even if it’s non-stick. These cups have a tendency to stick if you’re not careful. I use a good quality cooking spray with flour added — it makes all the difference.
Preparation Method
Let me walk you through making these Easy Cheesy Broccoli Rice Cups for Thermos Lunches. I’ve broken it down into clear steps with all the little details that make a difference.
- Preheat your oven to 375°F (190°C). Place your muffin tin on the middle rack so it heats evenly. While the oven is heating, generously spray the cups of your muffin tin with non-stick cooking spray. Don’t be shy here — these cups love to stick if you don’t prepare properly.
- Cook your rice if you haven’t already. You’ll need 2 cups of cooked rice, which is about ⅔ cup of uncooked white rice. Cook it according to package directions, then let it cool slightly. Warm rice is fine — just not hot enough to cook the eggs when you mix everything together. If you’re using leftover rice from last night’s dinner, even better. Cold rice works perfectly here.
- Prepare the broccoli. Wash your broccoli and pat it dry. Cut off the florets and chop them into very small pieces — about the size of a pea. You want them small enough that they distribute evenly throughout the cups, but not so small that they turn to mush. I usually end up with about 2 cups of finely chopped florets. Don’t use too much of the stem — it can be tough and stringy. Save those for soup stock!
- Blanch the broccoli. Bring a small pot of water to a boil. Add your chopped broccoli and cook for exactly 2 minutes. Drain immediately and rinse with cold water to stop the cooking process. This step is crucial — it softens the broccoli just enough without making it mushy, and it helps the broccoli stay bright green instead of turning that sad army green color. Pat the blanched broccoli dry with a clean kitchen towel. You want as little moisture as possible.
- Mix the wet ingredients. In your large mixing bowl, whisk together the eggs, milk, melted butter, garlic powder, onion powder, salt, pepper, and red pepper flakes if using. Whisk until everything is well combined and slightly frothy — about 30 seconds. This is the base that will hold everything together.
- Add the dry ingredients. Add the cooked rice, blanched broccoli, shredded cheddar cheese, and grated Parmesan to the bowl. Use your rubber spatula to fold everything together gently but thoroughly. Make sure every grain of rice and every piece of broccoli is coated in the egg mixture. The mixture should look quite wet — that’s normal. It should be thick enough to hold its shape when you scoop it, but not dry.
- Fill the muffin cups. Using a spoon or a cookie scoop, divide the mixture evenly among the 12 muffin cups. Press down gently with the back of the spoon to compact the mixture slightly. You want the cups to be full but not overflowing — about ¾ full is perfect. The tops should be slightly mounded.
- Bake the cups. Place the muffin tin in the preheated oven and bake for 20-25 minutes, or until the tops are golden brown and the edges are crispy. The cups should feel firm to the touch and a toothpick inserted in the center should come out clean. If the tops are browning too quickly but the centers aren’t done yet, tent the tin loosely with foil for the last 5 minutes of baking.
- Cool and release. Let the cups cool in the tin for exactly 5 minutes — no more, no less. This allows them to set properly. Then, run a thin knife or offset spatula around the edges of each cup to loosen them. Gently lift them out and transfer to a cooling rack. If any stick, let them cool another 2 minutes and try again. Patience is key here.
- Cool completely before packing. Let the cups cool completely on the rack before packing them for lunches. If you pack them while they’re still warm, they can steam and become soggy in the thermos. Patience, I know — but it’s worth it.
Cooking Tips & Techniques
After making these Easy Cheesy Broccoli Rice Cups for Thermos Lunches more times than I can count, I’ve picked up a few tricks that make the process smoother and the results more consistent. Let me share what I’ve learned — including the mistakes that taught me these lessons.
Don’t skip the blanching step. I know it seems like an extra step, but it makes a huge difference. Raw broccoli releases too much water during baking, which makes the cups soggy. Blanching for just 2 minutes softens the broccoli and removes some of that moisture. Plus, it keeps the broccoli bright green instead of turning that unappealing olive color. I learned this the hard way when I tried to skip this step during a particularly chaotic meal prep session. The cups were edible, but they were sad and wet. Never again.
Use room temperature eggs. Cold eggs can cause the melted butter to seize up, creating lumps in your mixture. If you forgot to take your eggs out of the fridge, place them in a bowl of warm water for 5 minutes before using. This small step makes a noticeable difference in how evenly everything mixes together.
Press the mixture down firmly. When you fill the muffin cups, really press the mixture down with the back of your spoon. This helps the cups hold their shape and prevents them from falling apart when you take them out of the tin. I use a small measuring cup with a flat bottom to press them down evenly — it’s the perfect tool for the job.
Let them cool in the tin. This is probably the most important tip I can give you. If you try to remove the cups from the tin while they’re still hot, they will fall apart. Trust me on this. I’ve made that mistake at least three times, and each time I ended up with a pile of cheesy broccoli rice crumbs instead of beautiful little cups. Let them cool for exactly 5 minutes, then run a knife around the edges and lift them out gently.
Multitask strategically. While your rice is cooking, you can chop the broccoli and shred the cheese. While the broccoli is blanching, you can whisk your eggs and measure your dry ingredients. This recipe comes together in about 15 minutes of active time if you organize your steps well. I like to do all my prep work first — mise en place style — so I’m not scrambling to find things while my rice is cooling.
Variations & Adaptations
One of the best things about these Easy Cheesy Broccoli Rice Cups for Thermos Lunches is how adaptable they are. I’ve experimented with quite a few variations, and here are my favorites.
Cheese Variations: Try using a mix of cheddar and Gruyère for a nuttier, more sophisticated flavor. Or swap in pepper jack for a spicy kick that kids and adults both love. I once made a batch with smoked gouda and it was absolutely divine — the smokiness paired beautifully with the broccoli. For a milder version, use mozzarella and cream cheese for an ultra-creamy texture.
Vegetable Swaps: Not a broccoli fan? No problem. Finely chopped cauliflower works beautifully — just blanch it the same way. You can also use chopped spinach (make sure to squeeze out all the moisture), finely diced zucchini (salted and drained), or even roasted red peppers. I’ve made a version with finely chopped mushrooms and it was surprisingly good — earthy and satisfying.
Protein Boost: Add ½ cup of cooked, crumbled bacon or diced ham to the mixture for extra protein. This makes the cups even more filling and turns them into a complete meal. I’ve also added leftover shredded chicken — about ¾ cup — and it worked great. Just make sure your added protein is fully cooked and well-drained.
Dietary Adaptations: For a gluten-free version, this recipe is already gluten-free as written — just make sure your rice is certified gluten-free if that’s a concern. For a dairy-free version, use vegan cheddar shreds and unsweetened oat milk. The texture will be slightly less creamy, but still delicious. For a lower-carb option, swap the rice for cauliflower rice — just make sure to squeeze out all the moisture before mixing. I’ve tried this and while the texture is different, it’s still a tasty alternative.
Freezer-Friendly Version: These cups freeze beautifully. Bake them as directed, let them cool completely, then place them on a baking sheet in a single layer and freeze for 1 hour. Transfer to a freezer-safe bag or container and freeze for up to 3 months. To reheat, simply pop them in a 350°F oven for 10-15 minutes, or microwave for 1-2 minutes. They’re perfect for busy mornings when you need a grab-and-go lunch solution.
Serving & Storage Suggestions
These Easy Cheesy Broccoli Rice Cups for Thermos Lunches are incredibly versatile when it comes to serving and storing. Here’s everything you need to know.
Serving Temperature: These cups are best served warm, straight from the oven or reheated. For thermos lunches, let them cool slightly before packing — you want them warm, not hot, to prevent steam buildup inside the thermos. Pack them while they’re still warm (about 10 minutes out of the oven) and the thermos will keep them at a safe temperature until lunchtime.
Presentation Ideas: For a fun lunch presentation, pack the cups in a thermos with a side of ranch dressing or ketchup for dipping. Kids love the interactive element of dipping. For adults, serve them alongside a simple green salad or roasted vegetables for a complete meal. They also make great appetizers for parties — just cut them in half and serve with a dollop of sour cream or Greek yogurt.
Storage Instructions: Store leftover cups in an airtight container in the refrigerator for up to 5 days. To reheat, microwave for 30-60 seconds, or reheat in a 350°F oven for 5-7 minutes. For longer storage, freeze as described above. I’ve found that the cups actually taste better the next day — the flavors have time to meld and develop. The texture might be slightly softer after refrigeration, but they’re still delicious.
Thermos Tips: To keep these cups warm in a thermos until lunchtime, preheat the thermos by filling it with boiling water and letting it sit for 5 minutes. Empty the water, then pack the warm cups inside. This simple step can keep food warm for 4-5 hours. I do this every morning before packing my kids’ lunches, and they always come home with warm, happy meals.
Nutritional Information & Benefits
These Easy Cheesy Broccoli Rice Cups for Thermos Lunches aren’t just delicious — they’re also packed with nutrients that make them a smart choice for lunchboxes. Here’s a rough nutritional breakdown for one cup (based on the recipe as written):
- Calories: Approximately 180-200 calories per cup
- Protein: 8-10 grams
- Carbohydrates: 18-22 grams
- Fat: 9-11 grams
- Fiber: 2-3 grams
- Calcium: 15-20% of the daily value
- Vitamin C: 30-40% of the daily value (from the broccoli)
Broccoli is a nutritional powerhouse — it’s rich in vitamin C, vitamin K, fiber, and antioxidants. Combined with the protein from eggs and cheese, these cups provide sustained energy that will keep kids (and adults) focused and satisfied throughout the afternoon. The calcium from the cheese supports bone health, while the complex carbohydrates from the rice provide steady energy without the sugar crash.
For those with dietary concerns, this recipe is naturally gluten-free and can be easily adapted for dairy-free or lower-carb diets. It’s also relatively low in added sugars — there are none in this recipe — making it a wholesome choice for school lunches. I love knowing that my kids are getting a balanced meal in every little cup, even when they’re eating away from home.
Conclusion
These Easy Cheesy Broccoli Rice Cups for Thermos Lunches have become a staple in my kitchen, and I honestly think they could become one in yours too. They’re simple, they’re delicious, and they solve that eternal lunch-packing problem: how to send something warm, nutritious, and actually appealing to school or work. The fact that they freeze beautifully and come together with just 15 minutes of active prep time is just the cherry on top.
I love this recipe because it’s forgiving — you can swap ingredients, adjust seasonings, and experiment with different cheeses without ruining it. It’s the kind of recipe that makes you feel like a good cook, even on days when you’re tired and rushed. And when you open that thermos at lunchtime and smell that familiar broccoli-and-cheese aroma? It’s pure comfort.
I’d love to hear how these turn out for you. Have you tried different variations? Did your kids love them as much as mine do? Drop a comment below and let me know — I read every single one, and I love hearing about your kitchen adventures. And if you found this recipe helpful, please share it with a friend who’s tired of packing the same old sandwiches. Happy cooking, friends — you’ve got this.
Frequently Asked Questions
Can I use frozen broccoli instead of fresh?
Yes, you can use frozen broccoli, but you’ll need to thaw it completely and squeeze out as much moisture as possible with a clean kitchen towel. Frozen broccoli contains more water than fresh, and too much moisture will make your cups soggy. I recommend fresh broccoli for the best texture, but frozen works in a pinch.
Can I make these ahead of time for the week?
Absolutely! These cups are perfect for meal prep. Bake them on Sunday, let them cool completely, and store them in an airtight container in the refrigerator for up to 5 days. You can also freeze them for up to 3 months. Just reheat and pack in a thermos for warm lunches all week long.
Why did my cups fall apart?
This usually happens for one of three reasons: too much moisture in the mixture (make sure your broccoli is well-drained), not enough egg to bind everything together (measure carefully), or removing them from the tin too soon (let them cool for exactly 5 minutes before releasing). If your cups are still falling apart, try adding an extra egg to the mixture next time.
Can I use brown rice instead of white rice?
Yes, brown rice works well in this recipe. It adds more fiber and a nuttier flavor, but it does make the cups slightly denser. Make sure your brown rice is fully cooked and cooled before mixing — hot rice can scramble the eggs. You may need to add an extra tablespoon of milk to compensate for the drier texture of brown rice.
How do I keep these warm in a thermos until lunch?
The key is to preheat your thermos. Fill it with boiling water and let it sit for 5 minutes while you warm the cups. Empty the water, then pack the warm cups inside. This simple step can keep food warm for 4-5 hours. I do this every morning before packing lunches, and it works like a charm.
Pin This Recipe!

Best Easy Cheesy Broccoli Rice Cups for Thermos Lunches

These Easy Cheesy Broccoli Rice Cups are perfect for thermos lunches, combining tender rice, fresh broccoli, and sharp cheddar in a portable, kid-friendly form. They come together quickly, freeze beautifully, and stay warm for hours without getting soggy.
- Prep Time: 15 minutes
- Cook Time: 25 minutes
- Total Time: 40 minutes
- Yield: 12 cups 1x
- Category: Lunch
- Cuisine: American
Ingredients
- 2 cups cooked white rice (long-grain preferred)
- 2 cups fresh broccoli florets, finely chopped (about 1 medium head)
- 1 ½ cups shredded sharp cheddar cheese
- 3 large eggs, lightly beaten (room temperature)
- ½ cup milk (whole or 2%)
- ¼ cup grated Parmesan cheese
- 2 tablespoons unsalted butter, melted
- ½ teaspoon garlic powder
- ½ teaspoon onion powder
- ½ teaspoon salt
- ¼ teaspoon black pepper
- Pinch of red pepper flakes (optional)
Instructions
- Preheat oven to 375°F (190°C). Generously spray a 12-cup standard muffin tin with non-stick cooking spray.
- Cook rice if not already prepared: you need 2 cups cooked (about ⅔ cup uncooked). Let cool slightly.
- Wash and pat dry broccoli. Chop florets into very small pieces (pea-sized).
- Blanch broccoli: bring a small pot of water to a boil, add chopped broccoli, cook for exactly 2 minutes. Drain and rinse with cold water. Pat dry with a clean kitchen towel.
- In a large mixing bowl, whisk together eggs, milk, melted butter, garlic powder, onion powder, salt, pepper, and red pepper flakes (if using) until well combined and slightly frothy.
- Add cooked rice, blanched broccoli, shredded cheddar, and grated Parmesan to the bowl. Fold gently with a rubber spatula until everything is evenly coated.
- Divide mixture evenly among the 12 muffin cups, filling about ¾ full. Press down gently with the back of a spoon to compact slightly.
- Bake for 20-25 minutes, until tops are golden brown and edges are crispy. A toothpick inserted in the center should come out clean. If tops brown too quickly, tent with foil for the last 5 minutes.
- Let cups cool in the tin for exactly 5 minutes. Run a thin knife around the edges to loosen, then transfer to a cooling rack.
- Cool completely before packing for lunches to prevent sogginess.
Notes
For best results, do not skip blanching the broccoli—it removes excess moisture and keeps the cups from becoming soggy. Use room temperature eggs to prevent the melted butter from seizing. Press the mixture firmly into the muffin cups to help them hold their shape. Let cups cool exactly 5 minutes in the tin before removing; removing too early can cause them to fall apart. To keep warm in a thermos, preheat the thermos with boiling water for 5 minutes, then pack warm cups inside.
Nutrition
- Serving Size: 1 cup
- Calories: 190
- Sugar: 2
- Sodium: 350
- Fat: 10
- Saturated Fat: 5
- Carbohydrates: 20
- Fiber: 2
- Protein: 9
Keywords: broccoli rice cups, thermos lunch, cheesy broccoli, kid-friendly lunch, meal prep, freezer-friendly