I was standing in the baking aisle of my local grocery store last October, staring at a row of neon food colorings, when a woman reached past me for the same bottle of red. “Making something creepy?” she asked, smiling. I laughed and said something about deviled eggs, and she nodded like that made perfect sense. But honestly, what I was really thinking about was my Aunt Clara’s kitchen, the way it smelled like paprika and something slightly burnt every Halloween. She’d been gone five years by then, and I still couldn’t make her deviled eggs without messing something up—too much mustard, not enough salt, the filling sliding off the white like it had somewhere better to be.
That year, I decided to stop trying to replicate her recipe exactly and just have fun with it. The eyeballs were an accident, really. I had some black olives left over from a party platter and thought, why not? I sliced them into rings, plopped them on top of the filling, and suddenly I wasn’t thinking about what Aunt Clara would think—I was laughing at how ridiculous and wonderful they looked. My kids went nuts. My husband, who claims he doesn’t like deviled eggs, ate four. And I realized that sometimes the best recipes come from letting go of perfection and embracing the silly, spooky, slightly messy joy of making something just for the fun of it.
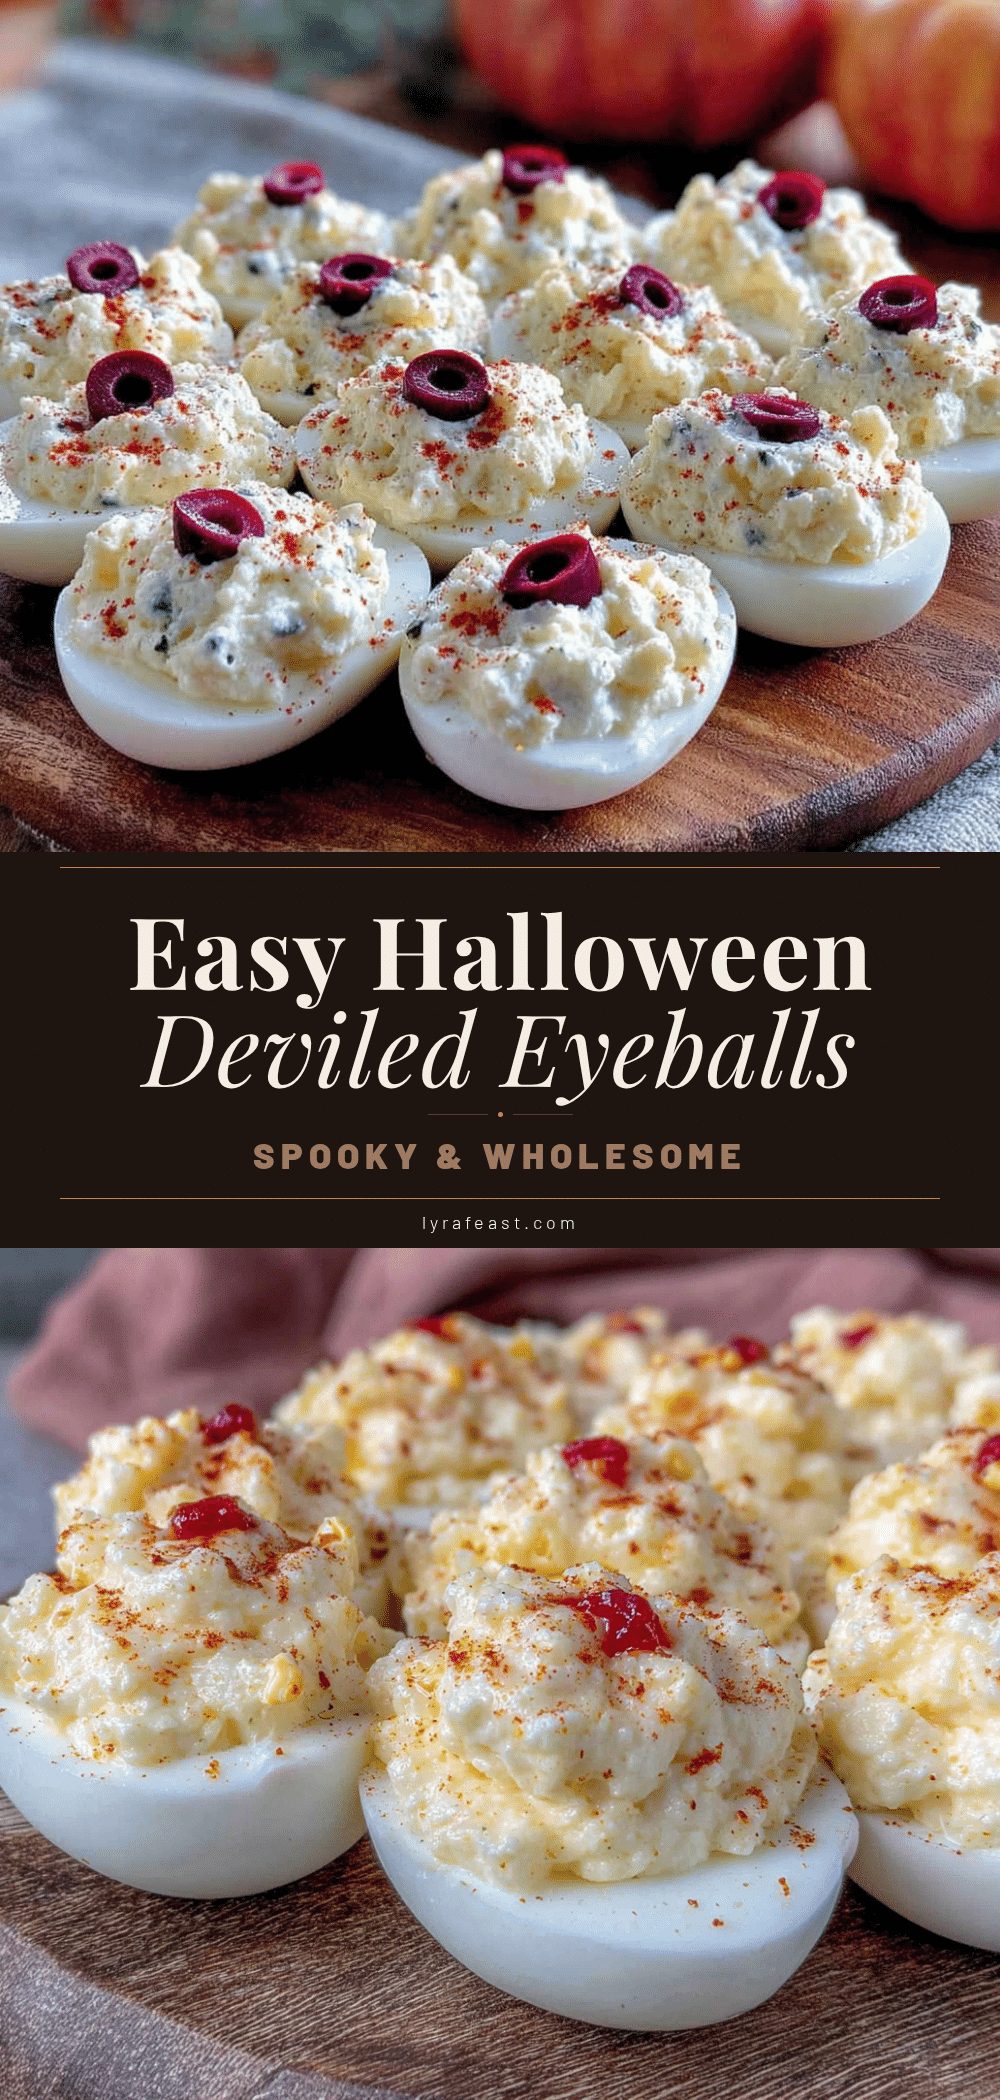
These Easy Halloween Deviled Egg Eyeballs are that exact energy in food form. They’re wholesome enough to serve at a kid’s party, creepy enough to impress your friends, and simple enough that you can whip them up in about 20 minutes flat. Maybe you’ve been there—staring at a Pinterest-perfect Halloween spread and thinking, I don’t have time for that. Well, these are your answer. They look like you tried, but they’re secretly the easiest thing on the table. And honestly? They taste even better than they look.
Why You’ll Love This Recipe
I’ve tested this recipe about a dozen times across three different kitchens—my own, my sister’s (where the stove runs hot), and a friend’s tiny apartment with a hand mixer that’s older than I am. Every single time, they came out perfect. Here’s why I keep coming back to them:
- Quick & Easy: From start to finish, you’re looking at about 25 minutes, including boiling time. That’s faster than ordering pizza, and way more impressive.
- Simple Ingredients: Eggs, mayo, mustard, paprika, olives, and a little hot sauce if you want a kick. You probably have all of this right now.
- Perfect for Halloween Parties: They’re the star of any spread—kids love the creepy factor, adults appreciate the classic deviled egg taste.
- Crowd-Pleaser: I’ve served these at three different Halloween gatherings and they disappear every single time. Even people who “don’t like deviled eggs” try one for the novelty and end up going back for seconds.
- Unbelievably Delicious: The creamy, tangy filling with that briny pop of olive is just… chef’s kiss. It’s comfort food with a spooky twist.
What makes these different from every other Halloween deviled egg recipe out there? It’s the texture. I blend the yolks with a little cream cheese—just a tablespoon—for an ultra-smooth, almost mousse-like filling that doesn’t slide off the egg white. No more sad, crumbling yolks. And the olive “pupil” stays put because I press it in just slightly, creating a little indent. It’s those tiny details that turn a good recipe into a great one.
This is the kind of recipe that makes you close your eyes after the first bite. Not because it’s fancy or complicated, but because it’s exactly what you wanted—creamy, salty, tangy, and just a little bit silly. It’s Halloween comfort food, reimagined for grown-ups who still want to have fun.
What Ingredients You Will Need
This recipe uses simple, wholesome ingredients that you probably already have in your fridge and pantry. The magic is in how they come together—creamy, tangy, with just the right amount of savory punch. Here’s what you’ll need:
For the Deviled Eggs
- 12 large eggs (look for eggs that are at least a week old—they peel easier than super fresh ones)
- 1/3 cup mayonnaise (I prefer Hellmann’s or Duke’s for that tangy creaminess, but any good mayo works)
- 1 tablespoon cream cheese, softened (this is my secret for silky smooth filling—trust me on this)
- 1 teaspoon yellow mustard (or Dijon if you want a sharper kick)
- 1 teaspoon white vinegar (adds that classic deviled egg tang without making it watery)
- 1/4 teaspoon salt (plus more for the boiling water)
- 1/4 teaspoon black pepper
- 1/2 teaspoon paprika (smoked paprika adds a lovely depth, but sweet works too)
- Optional: a few dashes of hot sauce (I use Tabasco, but Frank’s works great too)
For the Eyeball Decoration

- 1 can (6 oz) large black olives (look for pitted jumbo olives—they’re easier to slice and look more like pupils)
- 1 tablespoon capers (optional, for extra creepy texture—they look like little blood vessels)
- Red food coloring (optional, for “bloodshot” effect—just a drop mixed with a little water)
Ingredient Tips from My Kitchen
Let me save you some trial and error. First, the eggs: I’ve tried every boiling method under the sun, and the one that works best for peeling is starting with cold water, bringing it to a rolling boil, then covering and letting it sit for 12 minutes before shocking in an ice bath. Second, the cream cheese—make sure it’s truly softened, not cold. Cold cream cheese creates lumps, and we’re going for that silky smooth texture. Third, the olives: I’ve used sliced olives in a pinch, but they’re too thin and tend to slide off. Jumbo pitted olives give you that perfect creepy eyeball look.
For substitutions: If you’re dairy-free, skip the cream cheese and add an extra tablespoon of mayo instead. The texture will be slightly less rich, but still delicious. If you’re watching your cholesterol, you can use half the yolks and add extra mashed avocado for creaminess—it gives a green tint that’s actually perfect for Halloween! And if you can’t find jumbo olives, use regular black olives and just cut them into rings—they’ll look like smaller pupils, which is honestly cuter in a creepy way.
Equipment Needed
You don’t need anything fancy for these spooky eyeballs, which is part of the charm. Here’s what I use:
- Medium saucepan (for boiling the eggs—any size works, just make sure it fits your eggs in a single layer)
- Large bowl (for the ice bath—I use my salad bowl, no shame)
- Sharp knife (dull knives crush the yolks and tear the whites—I use my trusty Wusthof, but any sharp knife works)
- Cutting board
- Small bowl (for mixing the filling)
- Fork or potato masher (for mashing the yolks—a fork is fine, but a masher makes it faster)
- Spoon or piping bag (a small spoon works perfectly, but a piping bag with a star tip gives that fancy bakery look)
- Small knife or toothpick (for adding the olive pupils and any bloodshot details)
If you don’t have a piping bag, don’t worry—I’ve used a ziplock bag with the corner snipped off more times than I can count. It’s not as pretty, but it works. And honestly, for Halloween, a little imperfection adds to the creepy charm. My first batch looked like they’d been through a blender, and my kids still devoured them.
One tip: if you’re making these for a party, use a deviled egg carrier. I bought one for $12 at a discount store and it’s saved me from so many sad, squished egg disasters. But a plate covered with plastic wrap works fine too—just don’t stack them.
Preparation Method
Alright, let’s make some spooky eyeballs! I’ve broken this down into clear steps so you don’t end up with a kitchen disaster like my first attempt (note to self: do not use a hand mixer on hot yolks unless you want egg-splosion).
Step 1: Boil the Eggs (10-12 minutes)
Place your eggs in a single layer in a medium saucepan. Cover them with cold water by about an inch. Add a generous pinch of salt—this helps the shells peel off easier. Bring the water to a rolling boil over high heat. Once it’s boiling hard, cover the pot, turn off the heat, and let it sit for exactly 12 minutes. Meanwhile, fill a large bowl with ice and cold water. When the timer goes off, transfer the eggs to the ice bath and let them chill for at least 5 minutes. This shock stops the cooking and makes peeling a breeze.
Step 2: Peel and Halve the Eggs (5 minutes)
Gently tap each egg on the counter to crack the shell all over. Start peeling from the wide end—there’s usually an air pocket there that makes it easier. Run them under cold water if any stubborn bits stick. Rinse the peeled eggs to remove any tiny shell fragments. Using a sharp knife, slice each egg in half lengthwise. Gently pop the yolks into a small bowl. Arrange the whites on a serving platter, cut side up.
Step 3: Make the Filling (5 minutes)
Add the softened cream cheese to the yolks and mash everything together with a fork until it resembles coarse sand. Add the mayonnaise, mustard, vinegar, salt, pepper, paprika, and hot sauce (if using). Stir until completely smooth. Taste it—this is important! Adjust the salt, mustard, or hot sauce to your liking. The filling should be creamy, tangy, and just a little bit indulgent. If it seems too thick, add a tiny splash of vinegar or pickle juice. If it’s too thin, add a little more cream cheese.
Step 4: Fill the Egg Whites (5 minutes)
Now, you have two options. For a rustic look, use a small spoon to dollop the filling into each egg white, mounding it slightly. For a fancier presentation, transfer the filling to a piping bag fitted with a star tip (or a ziplock bag with the corner snipped). Pipe the filling into each egg white, creating a swirl that peaks slightly. This is where the “eyeball” effect really comes to life—the swirl looks like an iris.
Step 5: Add the Eyeball Details (5 minutes)
Slice your jumbo black olives into rounds, about 1/4 inch thick. You want them thick enough to stand out but thin enough to look like pupils. Gently press one olive slice into the center of each filled egg, creating a slight indent. If you’re using capers, arrange a few around the olive for a “bloodshot” effect. For extra creepiness, mix a drop of red food coloring with a teaspoon of water and use a toothpick to draw tiny red lines radiating from the pupil. Go easy on this—you want spooky, not gory.
Step 6: Chill and Serve (at least 30 minutes)
Cover the platter with plastic wrap and refrigerate for at least 30 minutes before serving. This allows the flavors to meld and the filling to firm up slightly. These are best served cold, straight from the fridge. If you’re making them ahead, you can prepare them up to 24 hours in advance—just add the olive pupils right before serving so they don’t dry out.
Cooking Tips & Techniques
I’ve made these eyeballs more times than I care to count, and I’ve learned a few things the hard way. Let me save you some grief.
The Perfect Boiled Egg: I used to get that green ring around the yolk every single time. It’s from overcooking. The 12-minute rest method I described above? That’s the one that finally gave me bright yellow yolks with no green. Also, older eggs peel better. If you have eggs that have been in the fridge for a week or two, those are perfect for deviled eggs.
Peeling Without Tears: I once spent 20 minutes picking shell fragments out of a single egg. The trick is to start peeling from the wide end where the air pocket is. If you’re struggling, peel the egg under running water—it helps the shell slide off. And if you end up with a torn white, don’t panic. Just use it as a tester for the filling, or hide the tear under extra filling.
Smooth Filling, No Lumps: The cream cheese needs to be truly softened, not just cold. Leave it on the counter for 30 minutes before you start. If you forget (I do, constantly), microwave it for 5 seconds at a time until it’s soft but not melted. Also, mash the yolks thoroughly before adding the wet ingredients—lumps are much harder to fix once the mayo is in there.
Piping Without the Mess: If you’re using a piping bag, fill it only halfway and twist the top closed. Squeeze from the top, not the middle. And if the filling squirts out the side of the bag? You didn’t twist it tightly enough. I’ve had filling on my ceiling before. Learn from my mistakes.
Making Them Ahead: These are perfect for party prep. Boil and peel the eggs up to 2 days ahead. Make the filling up to 1 day ahead. Assemble them the morning of your party, but add the olive pupils right before serving so they stay fresh-looking. The filling actually gets better after a few hours in the fridge—the flavors meld together beautifully.
Variations & Adaptations
One of the best things about this recipe is how easy it is to tweak. Here are some variations I’ve tried and loved:
Spicy Bloodshot Eyeballs
Add 1 teaspoon of sriracha or chili garlic paste to the filling for a spicy kick. The red color from the sriracha actually makes the filling look more “bloodshot” naturally. Top with a slice of pickled jalapeño instead of an olive for a truly fiery eyeball.
Guacamole Eyeballs (Dairy-Free)
Swap the mayo and cream cheese for mashed avocado mixed with lime juice and salt. The green filling looks incredibly creepy—like alien eyeballs. Use pimento-stuffed green olives for the pupils for an extra pop of color. This version is also Whole30-friendly.
Smoked Salmon Eyeballs
Add 2 ounces of finely chopped smoked salmon to the filling along with a tablespoon of capers. The salty, smoky flavor is incredible, and the pink tint makes the eyeballs look even more realistic. Top with a caper instead of an olive for a tiny, creepy pupil.
Gluten-Free and Keto-Friendly
This recipe is naturally gluten-free and low-carb. For keto, swap the cream cheese for full-fat cream cheese and use avocado oil mayo. Each eyeball has about 1 gram of carbs—perfect for a Halloween party where you want to stay on track.
Kid-Friendly Version
Skip the hot sauce and red food coloring. Use sliced black olives for the pupils and add a tiny dot of sour cream on top for a “highlight” that makes the eyeball look shiny and cute. My kids call these “friendly ghosts” and they eat them by the handful.
Serving & Storage Suggestions
These spooky eyeballs are best served cold, straight from the fridge. Arrange them on a platter lined with lettuce or dark purple cabbage for a dramatic Halloween look. I like to scatter a few “spider legs” made from chive stems around the platter for extra creep factor.
For a Halloween party spread, pair them with other spooky snacks like spiderweb dip, mummy hot dogs, or pumpkin-shaped cheese balls. They also go beautifully with a crisp white wine or a sparkling apple cider for the kids. If you’re serving them as an appetizer before dinner, they pair well with roasted pumpkin soup or a simple green salad.
Storage: Store leftover deviled eggs in an airtight container in the refrigerator for up to 3 days. The filling may weep slightly after 24 hours, so if you’re making them ahead, I recommend adding the olive pupils fresh. Do not freeze deviled eggs—the texture of the egg white becomes rubbery and the filling separates.
Reheating: Honestly, you don’t want to reheat these. They’re meant to be served cold. If you’ve refrigerated them and they seem too firm, let them sit at room temperature for 10 minutes before serving. The flavors actually deepen overnight—I’ve had people tell me the leftovers taste even better the next day.
Transporting: If you’re taking these to a party, use a deviled egg carrier or arrange them in a single layer in a shallow container with a tight-fitting lid. Place a paper towel on top to absorb any condensation. I once transported them on a plate covered with plastic wrap and ended up with a sad, jumbled mess. Learn from my mistake.
Nutritional Information & Benefits
Here’s the nutritional breakdown for one deviled egg eyeball (based on 24 servings):
| Nutrient | Amount per Serving |
|---|---|
| Calories | 65 |
| Protein | 5g |
| Fat | 5g |
| Saturated Fat | 1.5g |
| Carbohydrates | 1g |
| Fiber | 0g |
| Sugar | 0.5g |
| Sodium | 180mg |
| Cholesterol | 95mg |
Eggs are a fantastic source of high-quality protein, choline (great for brain health), and lutein (good for your eyes—how fitting!). The olive adds healthy monounsaturated fats and a dose of vitamin E. This recipe is naturally low-carb, gluten-free, and can be made dairy-free with the avocado variation. If you’re watching your cholesterol, you can use half the yolks and add extra avocado for creaminess—the green tint actually makes them look even more like eyeballs!
From a wellness perspective, I love that these are a protein-packed snack that doesn’t leave you feeling heavy. They’re perfect for a Halloween party where you want to enjoy yourself without derailing your healthy eating habits. One or two are satisfying, and you can feel good about serving them to kids and adults alike.
Conclusion
These Easy Halloween Deviled Egg Eyeballs have become a tradition in my house, and I hope they become one in yours too. They’re proof that you don’t need to spend hours in the kitchen or buy fancy ingredients to create something memorable. A dozen eggs, some simple pantry staples, and a little creativity—that’s all it takes to make a dish that people will talk about long after the Halloween candy is gone.
I love how versatile this recipe is. You can make it as simple or as fancy as you want. You can get the kids involved in peeling the eggs and placing the olive pupils. You can experiment with different fillings and toppings. And at the end of the day, you have a wholesome, delicious snack that just happens to look like it crawled out of a haunted house.
So go ahead—boil those eggs, mash those yolks, and get a little silly with it. Your Halloween spread will thank you. And if you come up with a crazy variation I haven’t tried, drop it in the comments below. I’m always looking for new ways to make these eyeballs even more delightfully creepy. Happy Halloween, friends—now go make something spooky!
Frequently Asked Questions
Can I make these deviled egg eyeballs ahead of time?
Absolutely! You can boil and peel the eggs up to 2 days in advance. Make the filling up to 1 day ahead. Assemble the eggs the morning of your party, but wait to add the olive pupils until just before serving so they stay fresh and don’t dry out.
How do I get my eggs to peel easily?
Use eggs that are at least a week old—fresh eggs are harder to peel. Add salt to the boiling water, and shock the boiled eggs in an ice bath immediately after cooking. Start peeling from the wide end where the air pocket is. If you’re struggling, peel under running water.
Can I use different types of olives?
Yes! Jumbo black olives give the most dramatic “eyeball” look, but you can use green olives with pimentos for a colorful twist, or kalamata olives for a more intense flavor. Just make sure they’re pitted and sliced thick enough to stand out.
How do I prevent the filling from sliding off the egg white?
Make sure your egg whites are completely dry before filling—any moisture will make the filling slide. Also, don’t overfill the eggs. If you’re piping the filling, create a slight swirl that peaks in the center—this gives the filling something to hold onto. The cream cheese in the recipe also helps the filling stay put.
Are these deviled eggs healthy?
They’re a great source of protein and healthy fats, and they’re naturally low in carbs. Each egg has about 65 calories and 5g of protein. They’re perfect for a Halloween party snack that won’t wreck your healthy eating goals. For a lighter version, use half the yolks and add mashed avocado.
Pin This Recipe!
Easy Halloween Deviled Egg Eyeballs: Best Spooky Recipe
These spooky deviled egg eyeballs are a fun and easy Halloween appetizer made with simple ingredients. Creamy, tangy filling topped with black olive pupils creates a creepy yet delicious treat that’s perfect for parties.
- Prep Time: 15 minutes
- Cook Time: 12 minutes
- Total Time: 27 minutes
- Yield: 24 servings 1x
- Category: Appetizer
- Cuisine: American
Ingredients
- 12 large eggs
- 1/3 cup mayonnaise
- 1 tablespoon cream cheese, softened
- 1 teaspoon yellow mustard
- 1 teaspoon white vinegar
- 1/4 teaspoon salt
- 1/4 teaspoon black pepper
- 1/2 teaspoon paprika
- Optional: a few dashes of hot sauce
- 1 can (6 oz) large black olives, pitted
- 1 tablespoon capers (optional)
- Red food coloring (optional)
Instructions
- Place eggs in a single layer in a medium saucepan. Cover with cold water by about an inch. Add a generous pinch of salt. Bring to a rolling boil over high heat, then cover, turn off heat, and let sit for exactly 12 minutes.
- Meanwhile, fill a large bowl with ice and cold water. Transfer eggs to the ice bath and let chill for at least 5 minutes.
- Gently tap each egg on the counter to crack the shell all over. Peel starting from the wide end. Rinse peeled eggs to remove any shell fragments. Slice each egg in half lengthwise and pop yolks into a small bowl. Arrange whites on a serving platter, cut side up.
- Add softened cream cheese to the yolks and mash with a fork until it resembles coarse sand. Add mayonnaise, mustard, vinegar, salt, pepper, paprika, and hot sauce (if using). Stir until completely smooth. Taste and adjust seasoning as needed.
- Fill the egg whites using a small spoon or a piping bag fitted with a star tip (or a ziplock bag with the corner snipped). Pipe or spoon the filling into each egg white, mounding slightly.
- Slice jumbo black olives into rounds about 1/4 inch thick. Gently press one olive slice into the center of each filled egg to create a slight indent. If using capers, arrange a few around the olive for a bloodshot effect. For extra creepiness, mix a drop of red food coloring with a teaspoon of water and use a toothpick to draw tiny red lines radiating from the pupil.
- Cover the platter with plastic wrap and refrigerate for at least 30 minutes before serving. Serve cold.
Notes
Use eggs that are at least a week old for easier peeling. Make sure cream cheese is truly softened to avoid lumps. For dairy-free, skip cream cheese and add an extra tablespoon of mayo. For a lighter version, use half the yolks and add mashed avocado. Store leftovers in an airtight container in the refrigerator for up to 3 days. Do not freeze.
Nutrition
- Serving Size: 1 deviled egg eyebal
- Calories: 65
- Sugar: 0.5
- Sodium: 180
- Fat: 5
- Saturated Fat: 1.5
- Carbohydrates: 1
- Protein: 5
Keywords: Halloween deviled eggs, spooky deviled eggs, eyeball deviled eggs, easy Halloween appetizer, creepy deviled eggs



